
By Tom Osypowski
Tom Osypowski is the owner of Equatorial Platforms and the night sky has been his steady companion for over five decades, ever since, at the age of 12, the urge came to look up at the stars from his boyhood home in Milwaukee. Tom’s journey with building astronomy equipment was chronicled in the August 2007 issue of ATT and he is shown on the cover of that issue here.
The Spicaeyes Dobsonian Truss Tube Telescope is a complete telescope system. Find an object fast with the Digital Setting Circles, then keep it centered with the tracking of the Platform. Use high powers to enhance the view. Grab the scope anytime to move around and explore a new area – there are no clutches to disengage. The optional Dual-Axis Platform provides the controls for astro-imaging and auto-guiding. There’s no field rotation to worry about.
SpicaEyes combine solid All-Aluminum construction with an advanced Ultra-Fast SlipStream Go-To drive system that integrates a Slip Clutch on both axes for full-time manual and motorized slew control. Featuring the finest Lockwood Optics, you can find objects fast by using the included Argo Navis computer. The telescope will automatically slew, or you can move it by hand. Once you find your target, the telescope will track it for you, keeping it centered in the field of view. The integrated SlipStream clutches allow you to move the scope at any time by hand or with the motorized slew control, with no levers to disengage.
The Structure
The overall structure of the telescope is a scaled-up version of Equatorial Platforms’ standard SlipStream alt-azimuth design, which features a stiff welded-aluminum frame, powder-coated with a deep-gray hammertone finish. Large altitude bearings rest on two 1.0-inch diameter stainless-steel rods that rotate in pillow-block ball bearings. Both the altitude and azimuth
movements of the telescope are driven by servo motors running through slip clutches.
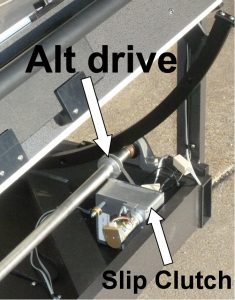
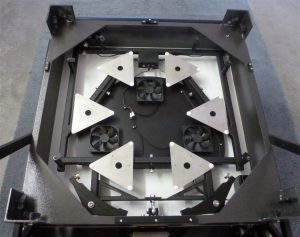
The altitude drive consists of a belt-and-pulley arrangement turning one of the two stainless-steel rods (Image 2). As this rod is turned, both of the altitude wheels are driven, making for a very stable movement.
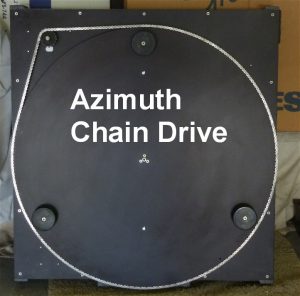
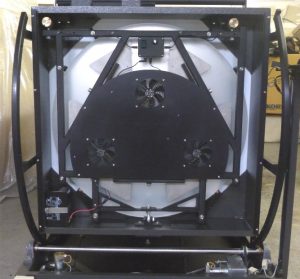
For the azimuth drive, a sprocket attached to the output shaft of the slip-clutch turns a stainless-steel chain that is wrapped around the edge of a large machined-aluminum ground-board disc (Image 3).
Both drives work remarkably well and provide precise, quiet (actually noiseless) tracking. The slip clutches allow the user to move the telescope by hand at any time without having to undo any levers to disengage the drives. Or the telescope can be moved with the cordless hand control, which offers the user a three-speed slew in both axes. Two sets of encoders assure that pointing accuracy is maintained at all times, whether the scope is moved by hand or with the push buttons.
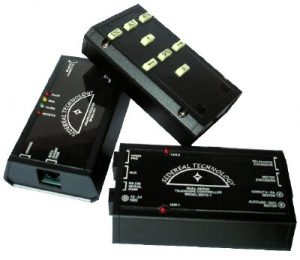
The remarkable Sidereal Technology drive controller is used to power the motors. The SiTech drive system features a small stand-alone computer that is attached to the telescope rocker box (Image 4). This computer analyzes information from both sets of encoders many times per second and constantly updates the movement of the servo motors. The telescope tracks objects with no other device needed, but if you add an Argo Navis or Sky Commander digital setting circle (DSC), then full motorized go-to operation is then possible.
The 32-inch telescope performs marvelously in this regard, with the GoTo’s putting objects in a 275x eyepiece across the sky.
Tracking, even at 900x, is vibration free, and with the cordless hand control, objects are quickly centered in the field of view by the push of a button. There’s no lag when using the push buttons and almost no backlash. With the faster slew, one could glide up and down the terminator of the moon as if doing a flyby.
And when using the highest powers, the slow slew allows one to move an object around the field with no effort or need to touch the telescope. Of course, at any time it is always possible to just grab the scope by hand and either center an object or explore the area around it. Seamless performance.
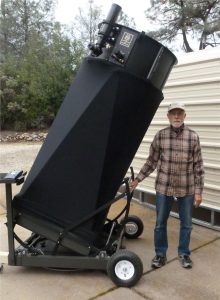
Setup and use of the telescope requires little effort. Large tires provide easy movement of the 400-pound structure, even over grass or dirt. No heavy wheelbarrow handles to lift! And the low eyepiece height offered by the hyper-short focal ratio (88 inches at the zenith) allows the use of a small, easy-to-handle ladder. This is a big telescope that does not intimidate.
What Performance Can You Expect – My Experience with the First Spicaeyes We Built
What can one expect, performance-wise, with an f/2.8 Newtonian system? This was the question rattling around in the back of my mind during the year spent constructing the original telescope and waiting for the optics. I had read some of the reports from Mike Lockwood and others about the performance of his ultra-short mirrors, but had never used one myself, so I retained a bit of skepticism.
One day, the primary mirror arrived, encased in an incredibly-sturdy wooden crate (thanks Mike!). We constructed the mirror cell while waiting for the 32-inch primary. It is a welded and powder-coated steel structure made from 1.0-inch square tubing. The back support for the mirror is a low-profile 18-point flotation setup with stainless-steel triangles (Image 5). Two rocker arms carry the four-point edge support. The whole cell, with mirror, swivels at its base when moved with the two large brass collimation knobs. These knobs are positioned near the top of the mirror box and easily accessible, even with the scope pointed at the zenith (Image 6). The three cooling fans in the back of the cell come with an adjustable speed control.
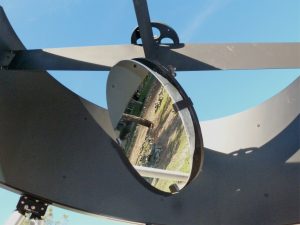
For the large 8-inch secondary, the owner of this telescope chose a lightweight cellular mirror, which was also provided by Mike Lockwood. When it arrived, this mirror proved indeed to be quite light in weight compared to a similar-sized monolithic piece of glass. It was mounted onto a custom holder made by Randy Cunningham at AstroSystems (Image 7). Because of the shape of the diagonal, it had to be glued onto the holder’s face plate, something I have always been leery of doing. It seemed especially dicey for a mirror of this size.
Still, it was the only option. The back of the mirror is not a solid piece of glass, but there were three obvious places to put spots of silicon glue. In the end, it turned out quite well. The mirror showed no signs of being distorted or warped, such as astigmatic images. There are three safety clips on the holder to restrain the glass if there is a failure of the glue.
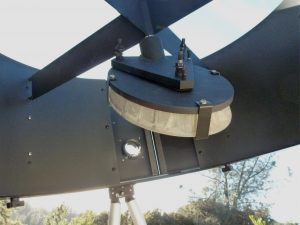
The plate that the diagonal is attached to is adjusted in tilt by three spring-loaded screws mounted to a second, smaller plate (Image 8). This works very well, and it is easy to precisely adjust the mirror for collimation. The four-vane spider that Randy also provided is super heavy duty. Once the vanes are tightened with two 1/4-inch bolts apiece, the rigidity of the whole assembly leaves nothing to be desired.
Collimation and First Light
With the mirrors installed, we rolled the telescope out of my shop to the observing site on the next clear night. We raised the scope off of its wheels and leveled it to the ground by shimming up the three feet on the bottom of the ground-board, as needed.
Next came collimation of the optics. This proved to be a snap with my Howie Glatter collimation laser. When it got dark, I tuned up the collimation a tad using an out-of-focus star. The movement of both the primary collimation knobs and the secondary screws is on the stiff side, so once an adjustment is made, it stays there. There is no slack or looseness.
Once the optics were collimated and the tracking engaged, we were ready for First Light! The moment of truth had come – how would this large fast mirror perform? My observing partner for this occasion was noted astro-imager and avid visual observer, Tony Hallas.
Our first object was Vega, since it was the brightest star in the twilight sky. The seeing was pretty good, as it often is early in the evening, before the air in our local foothills gets turbulent after darkness settles.
We first put a 7-mm Pentax XW eyepiece into the Tele Vue Type II Paracorr giving about 375x magnification. Vega focused down to a blinding point of light. There was no question when it was in focus. It just snapped in. Sharp and contrasty diffraction rings were visible, both inside and outside of focus. They were almost identical.
This surprised me! With fast mirrors, I was used to seeing diffraction rings on one side of focus (usually outside of focus), but just mush and spikiness on the other side. Not with this mirror. One thing working in our favor was that the mirror was pretty much cooled down at the time, since the scope had been in my shop all day, instead of out in the hot sun.
As darkness settled, we moved quickly from one object to another in order to get views of a variety of targets in before the seeing inevitably worsened as the evening progressed. First object was M13, fairly low in the west. Nice view at 370x, considering its low altitude and the crescent moon nearby. Thousands of stars filled the field. They were tiny, discreet pinpoints of light, a testament to the sharp focus this mirror was producing.
Next, we went to the Ring Nebula, which was higher up and well placed for a good view. And a good view it was! First at 380x. Then at 880x. At that high power, it dominated the field of view. While the seeing was by then starting to go downhill, the central star was still visible, sometimes with direct vision when the seeing sharpened up. This was with a so-so suburban sky (Milky Way visible, but not spectacular) and a crescent moon.
Also to be noted, the tracking at that high power was excellent, with no vibration or shaking. Using the hand control at the lowest slew rate, I could glide that huge image of the Ring to the center of the field with no difficulty. Then I did Go-Tos to
various other objects like the Dumbbell, the CatsEye, the Double Cluster and NGC 891. The scope quickly found every object in a 260x field of view.
But I also wanted to test the sharpness, especially the edge sharpness, with a lower power. So, I put in a 20-mm Nagler Type 5, which, with the Paracorr, produced 132x with a 2/3-degree field of view. Stars were pinpoints right out to the edge of the field! Yes! So much for worries about the coma of an f/2.8 focal ratio. The fabulous Type II Paracorr just ate it up.
Conclusion
Suffice to say for now that we were stunned by the telescope’s performance, both mechanically and optically. We did not expect to see the kind of images this f/2.8 mirror delivered. Tony, especially, is wary of shorter mirrors. For the 24-inch SlipStream Telescope that I built for him, he did not even want to go sub-f/4, much less sub-f/3! But after those first views with the 32-inch, he emailed Mike Lockwood with these comments
 “ Last night I had the opportunity to try out the 32″ f/2.8 Slipstream for which you made the optics … amazing! The seeing was less than ideal but you could see the figure on the mirror was outstanding, and with a Paracorr II the stars were round to the edge of the eyepiece. When you see the scope for the first time, it’s kind of a shock … like, ‘what the heck is THAT …???’ The real shock is when you look through it and see those perfect stars. This isn’t supposed to happen … Congratulations to you and Tom for pulling off the impossible.”
###
 The Astronomy Technology Today editorial staff would like to take this opportunity to remind you of the availability of our Solar eclipse equipment guide – The Definitive Equipment Guide to the 2017 Solar Eclipse. Our goal with the 40-page publication is to provide an easy-to-consume introduction to the technological options for viewing and imaging the Great Solar Eclipse. We cover the gamut of options available including building your own solar viewer, solar glasses, smart phones, DSLR cameras, using astronomy telescopes, solar telescopes, using binoculars, solar filters (including a DYI filter option), CCD astro cameras, astro video cameras, webcams and much more. You can view the guide on our website here – its free and there is no requirement to sign up to read the guide.