 By Peter Rejto
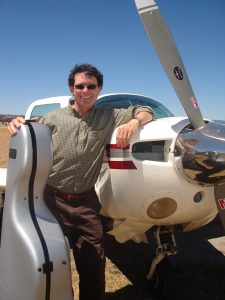
Peter Rejto, born into a family of musicians, initially followed a scientific career path, but ultimately left the doctoral biochemistry program at UC Berkeley to become a concert cellist. Now Professor Emeritus at Oberlin College, Rejto lives in Sydney, Australia with his family, but continues to direct the Tucson Winter Chamber Music Festival. Besides his interest in astronomy, Peter is an avid pilot and is the proud owner of a Mooney.
It has been said that if you don’t know where you are going, any road will get you there. This certainly could describe my twisted, undoubtedly masochistic, path towards the substance of this article. Who in their right mind would make a difficult hobby more than two times more difficult?
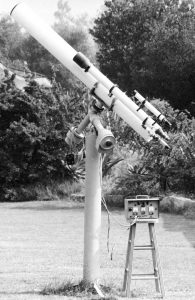
My astronomy journey started some 45 years ago, when as a teenager, I cobbled together a 5-inch Edmund’s-lens homemade f/15 refractor on a “cutting edge” Cave Astrola mount complete with a home-built frequency generator to manage the RA synchronous motor (Image 1). I managed to successfully image the Moon and occasional planet with self-processed black-and-white, 35-mm film. Those were heady days!
After the hiatus of a career, I found myself semi-retired and living in Sydney when the Astronomy bug hit very hard about seven years ago. The lure of the Southern sky is hard to resist. Little did I fully appreciate the vastly different and complicated evolution of astrophotography vis-à-vis modern mounts, and CCD cameras.
It all started simply enough with an HEQ5 and 100-mm Sky-Watcher refractor. I was astounded with the planetary images I could obtain so easily with a simple video camera compared to my efforts with film years earlier. But, that was probably the last time I naively thought anything was “easy” in this hobby.
Shortly, my fever began a crescendo resulting in a small bankruptcy due to the purchase of a Paramount MX and a beautiful TEC140. Refractors are simple – read that as “no collimation needed” – and it took little effort to appreciate what a marvelous scope the TEC140 is.
The MX put me in frightfully deep water, and for months I was quite lost. TheSkyX is a wonderful, but deep, program that took quite some time to sort out. To make a long story short, some of my difficulties were not entirely due to innate stupidity, as there was a subtle, but serious, issue with my particular MX. While it was returned to Software Bisque for repair, upgrade fever hit again and I decided that I wanted a larger mount. Software Bisque graciously allowed me to trade up to my current MEII – a fantastic piece of kit, as they say here in Australia.
Of course, how might one justify running a “little” TEC140 as payload on a mount such as an MEII? The search for a larger scope was on. I was intrigued by the Orion AG16 and approached a seller who just happened to be closing an observatory in Coonabarabran, Australia. By chance, I happened to look around his website and noticed a gorgeous TEC180 – a rare scope in this part of the world. At first the vendor wouldn’t consider parting with it. However, shortly after I declined to purchase his AG16 we closed the deal on the TEC180 with considerable hemorrhaging of money. I was always a refractor nut case and I couldn’t resist that opportunity of a lifetime.

During my search for a scope, I consulted with a well-known and -respected Australian astrophotographer, Mike Sidonio, as he runs a bit smaller Orion AG scope with great success. I mentioned to him that I’d bought a TEC180 instead and speculated that I probably should part with my TEC140, if only to pay some bills. His response was fateful. “Hey Pete, why not put them both on the same mount?” If only I’d known what this suggestion would lead to! But it resonated, because I hate parting with anything mechanical that has any value. My TEC140 was too wonderful to sell.
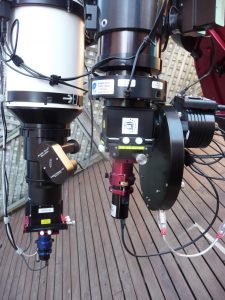
It’s no big deal to slap a second scope onto a beefy mount (Image 2). My MEII will carry 240 pounds of payload. The real issues come in the operation, particularly the coordination of hardware and software. And, because I got it in my thick head that I could possibly image with both scopes simultaneously, the problems came by the boatload.
The primary reason for taking this path was that I imagined I could save considerable time imaging by collecting RGB with the TEC140 and luminance with the higher resolution TEC180. If all went well I would have three times more luminance compared to the RGB combine. This struck me as close to ideal. (For the mathematically inclined, my system equates approximately to a single 228-mm – in terms of light-gathering ability, not resolution – f/4.95 telescope).
As the weather can be shocking in Sydney, saving imaging time made sense. Another possible advantage, particularly when imaging from a light-polluted site such as mine, is that gradients would be more similar between color subs and luminance given that they are taken on the same night and at the same time. In any case, justifiable reasons or not, what I failed to appreciate was that I would spend ten times more time testing and trying to get things working than imaging! So much for saving time!
Other Major Components
(1) ADM Crossbar: The saddle of my MEII was rotated 90 degrees to allow for an ADM crossbar to support both scopes side by side. I did think about mounting the TEC140 on top of the TEC180, but that configuration would not fit in my roll-off shed.
It may or may not have produced less differential flexure (DF) between the two scopes. I suspect it wouldn’t have made an appreciable difference given my suspicion that most of the DF is from the focusers and Optec Libra and not the side-by-side mounting, which is very robust. Rotating the saddle wasn’t entirely straightforward, as this configuration did not allow for internally routed cables. I had to fashion my own adapter plates. Software Bisque now sells a kit for this.
(2) Optec Libra Dovetail System: The second problem was alignment of the two scopes. I purchased an Optec Libra Dovetail System to mount under the TEC140. I have modified it to add additional stability. Photos are on my pages at PBase.com.
(3) Camera Rotation: Because my optical setup cannot accommodate rotators, I required a simple way to rotate both cameras precisely for framing. I added external scales to the tubes of both refractors. These are usually accurate to less than 1.0 degree and are exceedingly easy to operate. Unfortunately, this is one aspect of my system that cannot be operated remotely. Mostly, I just operate with both cameras “north up” (i.e., X on imaging camera chips = RA).
(4) Optec FocusLynx Dual-Focus Controller, MicroTouch and Starlight Instruments Focus Systems: I have two electronic focusers controlled though a single Optec FocusLynx Dual-Focus Controller. The hub controls a MicroTouch motor on the TEC140 and a Starlight Instruments SI-PDMS-TEC Motor System. I was a beta tester for this unit. It works superbly and can heft 56 pounds with a resolution of 2.3 microns/step. I really need to thank Jon Joseph (Starlight’s president) for coming up with this design. It filled a big hole for a focuser that would operate the Large TEC Focuser and carry a very heavy load.
(5) Innovations Foresight ONAG: Both scopes are fitted with ONAG systems by Innovations Foresight. There are several reasons I went down this path. Prior to buying the TEC180, I was contemplating the addition a rotator to my TEC140 and moving to off-axis guiding (OAG). The more I read about the ONAG, the more intrigued I became. Firstly, I wouldn’t need a rotator, and I would have many guide stars to select. So, when I started down the dual-scope path, I was already invested in this technology. But, why two ONAGS? Stay tuned.
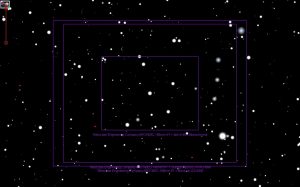
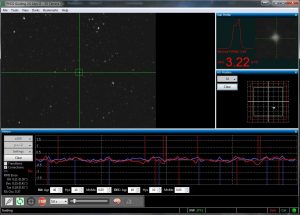
(6) Moravian G2-8300 and Starlight Xpress Trius: I already owned a Moravian G2-8300 (KAF8300 CCD), so I began the search for a camera to use on the TEC140 that would provide a similar resolution and field of view (FOV). The Sony ICX694 chip came pretty close (Image 3), and I decided on a Starlight Xpress Trius.
(7) TAK TOA-67 Flattener: The KAF8300 yields 0.88 arc-second resolution on the TEC180, and the Sony chip 0.95 arc-second on the TEC140. CCDStack has no difficulty combing images from the two cameras. I use a TAK TOA-67 TAK flattener mounted extremely close to the ONAG-XL on the TEC180. I designed a fitting that is totally flush with the ONAG body and saved several millimeters of critical back-focus over the best that Precise Parts could manage. It is the only flattener I could find that has sufficient back focus to accommodate the ONAG. I do not use a flattener on the TEC140.
(8) TheSkyX Camera Add-On (CAO) controls the Moravian G2-8300 on the TEC140, and CCDSoft controls the Trius on the Tec140.
(9) Starlight Xpress Ultrastar Guide Cameras: The system includes two Starlight Xpress Ultrastar guiders, with one reflashed to identify as a Trius 825, so that the cameras can be recognized as different by the imaging software. I owe a large thanks to Terry Platt of Starlight Xpress for his assistance with this problem.
(10) DigiPort Seven-Port Powered Hub and ICRON Ranger 2204: Running two imaging cameras and two guide cameras, AO and two focusers will create certain challenges with USB. I use a DigiPort -seven-port powered hub on the mount. At the base of the mount, I connect to an ICRON Ranger 2204 running CAT5 into my house and Windows 7 computer. This has been a reliable solution that took some time and experimentation to arrive at.
(11) A Starlight Xpress SXV-AO-LF (adaptive-optics unit) is fitted between focuser and ONAG TEC140.
Growing Pains
When I first began this project, I did not have all of the above equipment in play. I had one ONAG on the TEC180. With this setup, I could guide through TheSkyX and manually expose both cameras. Dithering wasn’t practical, although it could be done manually between images. I obtained very good results as long as the subs were not much longer than five minutes on the TEC140.
Beyond five minutes, particularly as the mount tracked west past the meridian, I would see increasing amounts of differential flexure in the TEC140 images. I immediately suspected the Optec Libra system. Jeff Dickerman suggested a simple modification, which was carried out by a local machine shop. It certainly made a large difference, however, the problem wasn’t by any means solved. In any case, it became quite tedious to image this way, and I began to look for some sort of automation.
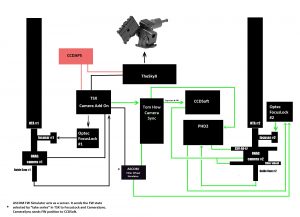
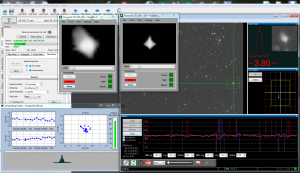
None of the available automation programs can control more than one imaging camera, so I needed something quite different. After some Internet searching< I came across a system in England that was developed by Tom How. There wasn’t any way to use his existing software in my particular situation, as it utilized Maxim and two computers. After some discussion with Tom, he went to work on a program (Image 4) that would synchronize exposures between two imaging cameras on the same Windows computer.
With Tom’s Camera Sync program, every time TheSkyX commands an exposure, a simultaneous exposure is triggered in CCDSoft. The exposures can be the same duration in both cameras, or some fraction (perhaps 0.5) in CCDSoft. For example, I can trigger a 10-minute exposure in TheSkyX and take a series of two 5-minute exposures in CCDSoft. TheSkyX will send a dither move to the mount after both cameras are stopped. This program was exactly what I needed!
Incidentally, this same program without modification can also synchronize exposures between two copies of TheSkyX Camera Add-On. Given that CCDSoft is now determined to be “obsolete” by Software Bisque, I’ve found that many experienced TheSkyX users are not aware of this possibility for multiple camera control.
Another major consideration in a dual system is that of focus. I attended the astronomy symposium in Tucson a few years ago and happened to meet Steve Brady of FocusMax fame shortly after he joined forces with CCDWare. When he told me that the then-new FM V.4 could control two focusers and had a Dual Focuser AcquireStar script that would automatically plate-solve start location, slew to focus star, focus both cameras, slew back, and plate solve, I was happy to say the least.
However, sometimes these things are easier said than done! Steve provided me with an incredible number of updates and experiments and finally we (he!) got it all working extremely well. The downside is the complexity and number of variables that need to all work in concert. The other is lost imaging time. I found that it could take up to sevem minutes to slew away and focus both cameras.
At the same Tucson event, I also met with Gaston Baudet of Innovations Foresight where I learned more about the Sharplock automatic focusing system via the ONAG. After the convention, I did experiment with Sharplock and came away very impressed with the capability and ease of focus. However, the software was limited, and I couldn’t find a way to integrate it into my software setup.
But a year or so later, I put my hand up to be a beta tester for Optec’s version of Sharplock called FocusLock. When I discovered that I could run two copies of FocusLock, and that it would talk to TheSkyX and Maxim DL (and later PHD2), I started to imagine a totally automated ability to stay in focus with both cameras all night! It was at that point in time that I bought my second ONAG.
With much help from Optec’s software guru, Daniel Van Noord, I sorted out all problems. I regularly run this system on both telescopes simultaneously. I need only find a guide star through both ONAGs. The rest is totally automatic … even initial focus each night! No more slewing away, and no more lost imaging time. It is a remarkable system and has reduced a great deal of complexity in automating my imaging system.
I should mention something about the guide cameras and more about FocusLock. I picked two lightweight wide-field Starlight Xpress Ultrastar cameras to maximize the FOV and obviate the need for rotators. Guide-star location has yet to be a problem for any target I’ve selected. I mounted these cameras using Gary Jarrette’s very nice KISS I and II Focusers using a special adapter plate he specially made for the ONAGs. These focusers are very sturdy and perfectly suited to the task of precisely focusing the guide star.
FocusLock works by having both the imaging camera and guide camera exactly in focus and thus “locked” together. Because ONAGs produce astigmatism in guide-camera images, changing astigmatic shape can be used to accurately predict the perfect focus point. The software monitors the star shape and commands a focuser move to maintain the in-focus shape.
FocusLock also monitors the filter wheel. If filters are not parfocal, FocusLock will introduce an offset when a new filter is selected. Immediately after a new filter is selected, focus is adju
sted automatically and quickly. FocusLock does adjust focus during exposures. Normally, changes to focus are very small and have not disturbed imaging at all, as best I can tell.
Filter-wheel control was initially difficult but now is also handled by Tom How’s Sync program. Initially, I thought to control camera number-two’s FW through TheSkyX, but there are two issues with this approach. (Note that camera number-one is only taking luminance subs, so it requires no FW control).
The first problem is that the filter-wheel position during “take series” in the current version of TheSkyX cannot effectively be read by external programs. This caused a major problem for FocusLock. The second issue was that there was no way to inform CCDSoft of the actual wheel position, meaning the FITS header information for the color subs was missing. This wasn’t a huge problem but more of an annoyance.
Tom How again came to the rescue! Tom pointed out that the inbuilt ASCOM filter-wheel simulator will act as a server and allow multiple programs to read the position of the filter wheel as commanded by TheSkyX “take series.” Tom’s program reads the filter-wheel position from the Simulator and sends the position to the filter wheel in CCDSoft. By having the filter wheel attached to CCDSoft, the FITS header is now correct. Optec’s FocusLock also reads the position directly from the ASCOM Simulator. Please refer to the software-map diagram in Image 7.
The issue of differential flexure, however, was always gnawing away in my brain. It seemed intractable in my otherwise maturing two-camera system. It felt like having a brand new shiny car that someone took a key to and scratched! When I mentioned this problem to friends, lots of them rolled their eyes and made helpful comments such as “give it up,” “buy a second mount!” “You will never get rid of it!” But after such a large investment in time and money, how does one give up?
I’m not exactly sure how I got the idea, but it eventually occurred to me that adaptive optics might come to the rescue. An adaptive-optics system could theoretically produce round stars on camera number-two regardless of any flexure between the two telescopes!
In my system, the mount is guided through the ONAG on the TEC180. The SXV-AO-LF on the TEC140 provides for optical corrections only. The “bump” command, which would normally move the mount as the SXV-AO-LF reaches the limits of travel, is necessarily disabled. As I already had an ONAG for focusing on the TEC140, I only needed to add the SXV-AO-LF in front of the ONAG (Image 5).
It took a while to get hold of a Starlight Xpress SXV-AO-LF, get it fitted, and learn how to work it. After issues with calibration, I was finally ready to test. I started guiding in TheSkyX and selected a guide star in PHD2 (which controls the SXV-AO-LF). I was quite disheartened to get a horrible result! Nothing I could do would produce acceptable guiding in scope number-two. I was confused and deflated, feeling quite ready to abandon additional complexity in a system that was already too complex.
After a month’s break and sanity check, I started in again, this time seeking out the advice of Andy Galasso of PHD2. I ran experiments where I turned off guiding in PHD2 and just watched the PHD2 guide graphs while guiding in TheSkyX. What I saw was very revealing! The PHD2 guide star was drifting far more than could possibly be due to differential flexure. Andy pointed out that it had to be field rotation.
This is where it gets interesting. I am permanently set up and polar aligned very well (inside 30 arc-seconds in ME and MA). How and why should there be so much field rotation? It turns out that a field rotates around the selected guide star which in this case was determined by TheSkyX. By selecting a different guide star in PHD2, I was looking at rotation plus differential flexure. Suddenly all was clear! By picking the same guide star in both cameras I would only see differential flexure.
After experimenting with the SXV-AO-LF settings, it turned out that longish exposures (3-5 seconds) and low aggression (40-50 percent) give the most satisfactory results. The two wide-field guide cameras are oriented and aimed to show a star field in the same orientation. This aids considerably in picking the same star. With two typically narrow-field guide cameras, this task would be much more difficult. I can now expose up to 20 minutes or longer in camera number two with no hint of elongated stars! Ironically camera-two images now are often better in FWHM and eccentricity than camera one.
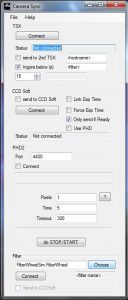
It is also quite interesting to observe how differential flexure changes with telescope position. Sometimes there is barely any, and at other times way too much. Referring to the screen shot photo of PHD2 (Image 6), the adaptive-optics section is the box on the right side of the image. The yellow box marks the boundary of the mount bump, and the red box marks the limits of the adoptive-optics travel. The white dot shows the current position of the adaptive optics from centered.
The two photos show the amount of differential flexure after 20, and 27 minutes. After 20 minutes, the differential flexure is ca 4.5 arc-seconds. After 27 minutes, it’s 6 arc-seconds. From this, it is now very clear why I was unable to obtain useful images in excess of five minutes. In any case, the adaptive-optics system handles all of these situations perfectly and has never come close to exceeding the optical limits of travel in a single exposure.
As an aside, my experiments clearly demonstrate that the field will rotate much more than one expects, even when polar aligned very well. Keeping this in mind (and I’ve not seen this idea expressed before), those with wide-field guide chips might do well to ensure that the same guide star is selected from night to night. Given that each different guide star will produce a unique field of rotation, images from one night to another might not perfectly register during stacking, if the guide star is changed. The effect might be small, but it is certainly there.
With off-axis guiding, this probably never becomes a concern once a guide star is picked for a target, as there is no reason to change it. And with a guide telescope, even though the field is large, the short focal length of the imaging scope probably means differences in rotational centers wouldn’t be noticed. However, an ONAG on a long-focal-length scope might prove to be a problem, if different stars are selected.
Again, automation issues came into play as I now needed to manually stop/start the SXV-AO-LF between exposures to prevent the adaptive optics from trying to correct during a dither motion, and to also prevent the adaptive optics from exceeding the optical limits of travel. Simply starting and stopping the adaptive optics will re-center it between exposures in PHD2.
The other issue is that after stopping, it must return to the same guide star. So, I once again turned to Tom How. He and Andy Galasso worked out a few details, and Tom was able to add features into the TheSkyX Camera Sync program to control the SXV-AO-LF through PHD2. I can now dither images, synchronize the imaging cameras, and correct for differential flexure all automatically. Focus is entirely automatic and CCDAutopilot (CCDAP5) can control the entire system … as if it were running a single camera through TheSkyX!
Because the CCDAutopilot camera is capturing luminance only, I can set camera number-two’s filter wheel in TheSkyX (as discussed earlier) by using the ASCOM Simulator. CCDAutopilot commands FW changes, not knowing they are going over to camera number-two. The software block diagram shown in Image 7 should make all of this clear.
Running all of these programs on a single computer requires at least two monitors. I’ve had terrific runs of many hours completely unattended with nothing missing a beat. Of course, there are some dangers and issues here and there. Any glitch that requires a reboot is no fun, as the most arduous task of any given night is just getting it all up and running. Here is my usual routine:
- Start TheSkyX and connect to the mount and home the mount.
- Start camera number-one in TheSkyX.
- Start CCDSoft and connect to camera number two.
- Start PHD2 and connect to guide camera number-two, TheSkyX ASCOM mount driver, and the Starlight Xxpress AO unit.
- Start Camera Sync program, then connect to TheSkyX, CCDSoft, PHD2, and the filter wheel.
- Plate solve the previous image of the target, and close-loop slew to the center of the solved photo.
- Connect to guide camera number-one and begin guiding.
- Start FocusLock number-one, load profile, and start to focus the imaging camera/guide camera number-one.
- Start FocusLock number-two, load profile, and start guiding in PHD2 to focus #2 camera.
- In TheSkyX CAO setup “Take Series” sub frame duration, filter wheel* values and dithering.
- In CCDSoft, match the sub-frame length to value in TheSkyX CAO.
- Take pictures by starting “Take Series” in TheSkyX CAO.
The Camera Sync program tells CCDSoft to expose, PHD2 will stop guiding and loop exposures for a few seconds, then go back to the same guide star, re-center the Starlight Xpress adaptive-optics unit, and start guiding. When the exposures complete, PHD2 will stop guiding through the adaptive-optics unit. TheSkyX will then dither. After the dither, everything repeats.
And that is my 12-step program for dual scope addiction!
What I’ve written about in the previous paragraphs took four to five years of experimenting. There was much grief and few moments of elation. I’ve not written very much about hardware issues I’ve had to solve, because they are specific to my equipment and not of so much value to others. Suffice to say, there were numerous experiments that led up blind canyons and consumed months of effort.
However, returning to happy moments, none was larger than the last step that finally put to rest, once and for all, the issue of differential flexure. Consider that even with a very rigid system involving wo well-made refractors with excellent focusers, the problem could not be tamed for images over five minutes; even five minutes is basically unachievable below an altitude of 45 degrees.
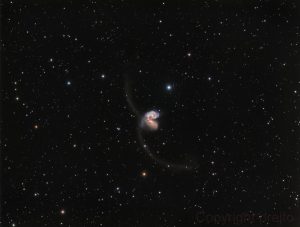
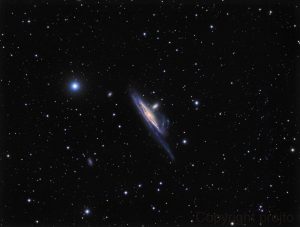
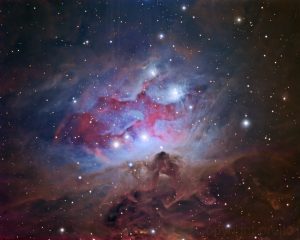
My opinion is that, a dual mirrored-OTA system would be practically impossible to manage, unless one considered the use of adaptive optics to eliminate the differential flexure. For astrophotographers in locations where clear sky is an issue, a system such as mine might well be considered. I have posted some recent images with some 40-plus hours of integration. But, of course, the reality is I did them in 20 hours … if you forget about the years of testing.
Similar systems might be achieved without resorting to a pair of ONAGs and without CCDSoft. Dual ONAGs are a nice solution but are not an answer for certain systems given the back-focus requirements. The Camera Sync program will talk to two copies of TheSkyX, however, focus via FM v.4 might not be possible, as my understanding is that FM will not be able to distinguish between the two imaging cameras in the two copies of TheSkyX. However, Steve Brady may have a solution to that issue, if pressed. Off-axis guiding could be used on both scopes, but such a system would probably require two rotators.
I imagine that two copies of TheSkyX would connect to two uniquely identifiable rotators. An automated focusing system from Optec called Lacerta using FocusLock is now available for the Lodestar guide camera. It requires off-axis guiding and no ONAG is needed.
Kits to modify other popular guide cameras are promised. In my view, the ability to stay on target without focus slews greatly enhances the possibility for success with such a complicated system. For now, it appears that the Starlight Xpress SXV-AO-LF together with PHD2 is the only solution to address the differential-flexure issue with a second imaging camera.
PHD2 is a wonderfully flexible program and is scriptable. As it stands now, PHD2 talks to FocusLock and the Camera Sync program TheSkyX, and runs the SXV-AO-LF very reliably.
Maxim DL is certainly another option, as it will also send guide images to FocusLock and run the SXV-AO-LF, although it requires a Starlight Xpress guide camera. Currently the Camera Sync program cannot communicate with Maxim. In a situation where FocusLock cannot be used, focusing via FMv4 dual focuser script can be achieved from CCDAP5.
At this point, however, I don’t see any way for CCDAP5 to program multiple targets. For sure, CCDAP5 will start guiding successfully in TheSkyX; the problem is with PHD2, as it will have no way to know which star to select. I might try to solve that problem next. Nah, I think enough is enough.
Putting a different system together may feel like a game of chess; many possibilities, with every move changing the nature of the game. With so many components, I cannot imagine this working outside of a permanently setup observatory! Anyone interested in building up their own system can trial Tom How’s Camera Sync program from his website, http://astro.neutral.org/software/astronomy-software.html.
I’ll close by once again thanking all who have tolerated my insistent questions and provided so much support: Steve Brady, Gaston Baudet, Terry Platt, Daniel Van Noord, Jeff Dickerman, Tom How, Gary Jarrette, and Andy Galasso. If you have any question, please feel free to contact me via peter.rejto@oberlin.edu.
See Final Images By Scrolling Below
###
 The Astronomy Technology Today editorial staff would like to take this opportunity to remind you of the availability of our Solar eclipse equipment guide – The Definitive Equipment Guide to the 2017 Solar Eclipse. Our goal with the 40 page publication is to provide an easy-to-consume introduction to the technological options for viewing and imaging the Great Solar Eclipse. We cover the gamut of options available including building you own solar viewer, solar glasses, smart phones, DSLR cameras, using astronomy telescopes, solar telescopes, using binoculars, solar filters (including a DYI filter option), CCD astro cameras, astro video cameras, webcams and much more. You can view the guide on our website here – its free and there is no requirement to sign up to read the guide.