
I have been involved with astronomy for a number of years and building my own artificial star came naturally. As in so many hobbies, there are countless gadgets and doodads that can make your astronomy setup, alignment, and viewing much more enjoyable.
Unfortunately for most of us, without the benefit of a winning lottery ticket, cannot afford all of them. I have, however, been able to make quite a few accessories for very little money. For example, I made a dew shield with a polypropylene leaf bag spreader, some felt, and some Velcro. Total cost: $7.
I also made a case for an 8” Schmidt Cassegrain Telescope (SCT) with a storage trunk found at a garage sale and camping pad, also for $7. My case for my current 11” SCT is plastic storage box from the big-box hardware store with foam. These projects have saved me money, or at least allowed me to spend more money on gear such as eyepieces and filters (much to the chagrin of the domestic CFO)!
 This article describes an artificial star that can be made for less than $2. Star testing is one of those semi-arcane topics that I don’t fully understand, but simple star testing for collimation is pretty easy. The bible is “Star Testing Astronomical Telescopes” by Harold Richard Suiter, which contains more information than you’ll probably ever need, along with the math and theory.
Collimation is critical for reflectors and SCT scopes for maximum contrast and light transmission. There are several great sites on the Internet explaining the theory and practice of collimation. One other recommendation, especially for SCT owners is a set of collimation thumbscrews from Bob’s Knobs. The last thing you want to be doing is trying to reach around the telescope, while looking through the eyepiece, with a pointy Phillips screwdriver aimed at your corrector glass trying to find a screw head in the dark!
Most collimation instructions say to use a bright star for observing. The problem with using a real star is that, due to celestial motion, you must track it. Which means that if you have a motorized scope, you must be polar-aligned or tracking in two axes. If you’re using a manual scope, you must be constantly moving to compensate. Also, when you make adjustments to your scope, you must re-center the star after every turn of a collimation screw. In short, it is much easier to do these alignments if both the scope and star are static.
Artificial stars are commercially available. They have precision-sized holes useful for precise measurements for star testing. For collimation, though, such accuracy is not required, and for just a couple dollars’ worth of parts at your local big-box hardware store, you can make a star sufficient for your alignment. Other suggestions that I found for star testing included mounting a silver ball bearing on a piece of wood and using it during the day with the sun shining on it as the light source, but I wanted something portable and easy to place a distance away.
Here are the parts I bought:
– One 1” PVC Coupler ($0.35)
– Three 8-32 3/4” Nylon Screws ($1.12 for two packs of two)
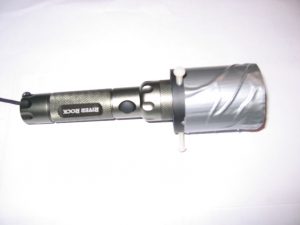
Other items were materials I had around the house. I used a spare LED flashlight, HVAC metal repair tape, duct tape, and clear packing tape. The metal repair tape is essentially thick aluminum foil with an adhesive backing; a 50-yard roll costs about $8, though you only need a few inches. Also, the screw size listed above is not critical; they just need to be big enough to hold the flashlight securely. If you do not have a tap and die set, choose a screw size for which you have a matching metal screw that can act like a tap and cut the threads. I borrowed a sewing needle from the domestic supply cabinet.
 Construction is fairly simple. drill three holes 120° apart around the coupler about 1/2“ from the edge. The coupler I purchased had one smooth side and a side with some raised printing. Put the screw holes on the side near the printing so the aluminum tape can attach to the smooth side. Use a drill bit smaller than the diameter of the screw as a pilot hole for the tap. I used a 1/8” size bit. Tap the holes with either your tool or the matching metal screw to make the threads for the nylon screws.
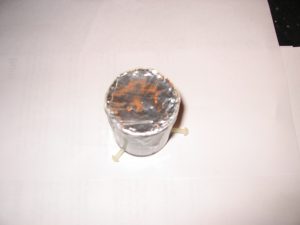
Next, cut a small piece of the metal tape so that it will have about ½” overlap on the coupler. Using the smallest sewing needle you can find and against a very hard surface such as glass, making a small pinprick in the center of the foil.
The commercial artificial stars start at about 50 microns (about the width of a human hair) but it impossible to measure that at home. A typical pinprick will be about 100 micron or 0.1mm. Again, this is a “good enough” project! Another tip I picked up on the Internet is that if you want to try and do some star testing measurements such as actually measuring the spherical aberration, make another hole precisely 1/10” next to the first. I didn’t do that on mine, however you can search the web to learn more.
Remove the backing and, centering the hole over the coupler, smooth it down. You want the foil as tight and smooth over the opening as you can get it. Then cover the foil with some clear packing tape over the top of the foil to protect it. I then wrapped the outside of the coupler with some duct tape to make it tidier. Here is a picture of the final assembly with the flashlight installed with the three screws to hold it:
Happy (cheap) artificial star collimation!
 Paul Grunwald works in the aerospace industry as Chief Systems Architect/Director of Business Development at Great River Technology. He served in the Navy (Submarines) for six years earning the rank of ET1(SS). He has BSCS from Western Washington University, and an Executive MBA degree from the University of New Mexico.
And to make it easier for you to get the most extensive telescope and amateur astronomy related news, articles and reviews that are only available in the magazine pages of Astronomy Technology Today, we are offering a 1 year subscription for only $6! Or, for an even better deal, we are offering 2 years for only $9. Click here to get these deals which only will be available for a very limited time. You can also check out a free sample issue here.