
By Shef Robotham
Shef Robotham lives in New England and is a retired electrical engineer who has numerous patents relating to lasers. He has been actively involved in astronomy for over 30 years covering optical, radio and astro-imaging. Other interests include music, HO trains, and amateur radio and a supporting wife of 45 years.
When initially setting up an astronomical imaging system with an external guide scope, aligning the imaging camera and guide scope is one of the first steps undertaken. Finding a suitable guide star within the guide-scope field of view is usually not a problem with today’s auto-guide cameras that have good sensitivity. Therefore, aligning the imaging and guide scope to the same central object results in adequate stars to provide auto-guide error input.
 I previously used nylon, 1/4-20, adjusting bolts in the mounting rings so that while adjusting the guide scope to imaging scope, the bolt end would not dig into, or scratch, the guide-scope tube surface. The soft bolts, along with two or three layers of electrical tape, have preserved my guide scope’s optical tube finish.
But my guide scope was changing its alignment relative to the imaging scope, so I was frequently making small adjustments in pointing. Part of the problem was the large inside diameter of my rings relative to the outside diameter of the guide scope making long adjusting bolts necessary.
The long nylon adjusting bolts would bend between the interior diameter of the ring and the guide-scope surface, which caused the guide-scope alignment to shift. I did not immediately recognize that the bolts were bending, and I made the problem worse by tightening the nylon bolts further with each readjustment.
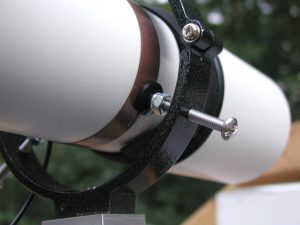
The solution was to replace the nylon 1/4-20 bolts with stainless-steel bolts. To cushion the contact between the end of the bolt and guide-scope tube, I placed a 1/2L Beveled Faucet Washer at the end of each alignment bolt. To prevent the stainless bolt from working its way through the washer hole, I ran a 1/4-20 Nyloc nut up the bolt by about one or two threads. This prevents the bolt from going through the faucet washer and spreads the load of the adjusting bolt over a larger area. A washer could be used between the nut and faucet washer, as well. The Nyloc nut will stay in place, but periodic checking should be done.
The only tricky part is putting the nut on the bolt as the bolt must be run through the ring first. This, coupled with the Nyloc nut needing some “persuasion” to thread onto the stainless bolt, results in some tools that might not normally be associated with such delicate equipment.
All material is available at your local big-box home-improvement store. The accompanying photo shows one of the new no-mar, non-deflecting adjustment screws in place.
###
 The Astronomy Technology Today editorial staff would like to take this opportunity to remind you of the availability of our Solar eclipse equipment guide – The Definitive Equipment Guide to the 2017 Solar Eclipse. Our goal with the 40 page publication is to provide an easy-to-consume introduction to the technological options for viewing and imaging the Great Solar Eclipse. We cover the gamut of options available including building you own solar viewer, solar glasses, smart phones, DSLR cameras, using astronomy telescopes, solar telescopes, using binoculars, solar filters (including a DYI filter option), CCD astro cameras, astro video cameras, webcams and much more. You can view the guide on our website here – its free and there is no requirement to sign up to read the guide.