
Editor’s Note: Springer describes Building and Using Binoscopes thus: “Focusing on both homemade and commercial products, this book provides the reader with simple and straightforward information about the modelling and building of binoscopes. Binoscopes can be thought of as binoculars enlarged to the size of telescopes: essentially, a combination of the two. Constructing a binoscope is easier than most people think, but it still demands attention to detail and proper background knowledge. The author goes on to provide additional information about how to understand the products currently on the market, should the reader choose to purchase a binoscope instead of building one. Lastly, the book also compares binoscopes with telescopes in great detail, outlining the differences the reader can expect to see in the night sky from using both. The celestial views obtained with a binoscope, compared to a single telescope of the same aperture, are a very different experience and well worth the effort.”
Having enjoyed Norm’s book and having compared views through binoscopes versus telescopes of comparable aperture, I found myself nodding in agreement with Springer’s assessment. Binoscopes are indeed “a very different experience and well worth the effort,” and Norm is the guy who literally wrote the book on them.
About Binoscopes – Focusing on Three Fundamentals: Cost, Performance and Function
Just for the record, your modern commercial or homemade binocular telescope’s DNA can be traced back to about the year 1928, when Hilmer Hansen, a Nebraska farmer from Holdrege, Nebraska, built a one-of-a-kind dual 6-inch binocular telescope and mount, or “binoscope,” from spare parts found around his farm, including grinding and polishing his own mirrors. Quite an achievement for that period considering the scarcity of parts and materials available for an enterprising ATM back in those days.
Why did he bother? He knew that you see far more through a binoscopes, observing with both eyes, than through a single-tube telescope of comparable aperture. Thus, binoscopes have greater potential than conventional telescopes for aiding observers in discovery of objects that are new to them – including comets. Indeed, I’m a little surprised there aren’t more visual comet discoveries made with binoscopes these days, given the number of commercial and homemade binoscopes in use, and especially given that we perceive so much more visual data when viewing with both eyes through two big mirrors or objective lenses.
If you need inspiration for comet hunting with binoscopes, I offer the example of the late great Australian comet hunter, Bill Bradfield, who discovered comet C/1980 Y1 aided by nothing more than a pair of old 7×35-mm binoculars. Imagine what you might accomplish when searching the sky for new comets with a 16-inch binocular telescope. Should be a piece of cake, right? Some would call it luck, but dedication and focus, not luck, explain Bill’s 18 comet discoveries. Keep that in mind and, who knows, someday you too might score a comet discovery.
It Pays to Shop Around
On occasion, someone will ask at a local star party or at the Riverside Telescope Maker Conference (RTMC), “How should I decide what kind of binoscope to build?” The classic answer is that the design you select – whether reflector or refractor – should depend on what you plan to observe.
For example, a no-frills 10-inch f/4 Newtonian binoscope built in the Dobsonian style on a stable alt-azimuth mount has enough aperture for observing a broad range of deep-sky objects, while remaining intuitive to use. Most ATMs have clear ideas about what class of objects they hope to observe, such as comets – maybe even UFOs! – so it makes sense to start the design process by identifying what objects you will most often observe.
The classic answer makes sense, but it’s not what I do or recommend. Because of its simple design, that no-frills Newtonian binoscope is not only versatile, it’s also relatively affordable, and it’s that factor that most often drives my actual answer to the question of what binoscope design to pursue.
You see, when it comes to building a binoscope, you must think in terms of “times two” – twice the OTAs, twice the diagonals, twice the eyepieces, etc. Yes, binoscope costs can add up twice as quickly as singe-tube ATM builds, and so, my less-than-classic actual answer to the question, “How should I decide what kind of binoscope to build?” is “I almost always think first about the cost.”
Fortunately, there are proven strategies for mitigating that times-two factor. Used and thus steeply discounted components, including optics, can often be sourced from other ATMs via CloudyNights.com and Astromart.com, and while new components are available from such familiar mass-market outlets as eBay and Amazon, they can also be found through international outlets like Made in China, Alibaba and AliExpress. As the saying goes, it pays to shop around.
Innovation
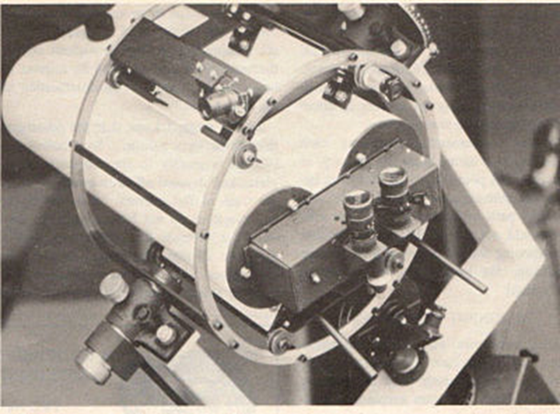
Innovations in the design and build of binoscopes generally impact three fundamental aspects: cost, performance and function. Anything else is often window dressing. Image 1 shown here offers one example of innovation: rotating a pair of 6-inch f/15 Dall-Kirkham Cassegrain optical tubes a full 360 degrees in a dual-steel ring, eight-pulley system on a clock-driven fork-equatorial mount. Although this innovation increased the cost of the project and did nothing to enhance the performance of the individual optical tubes, the improvement in function – improved access to the dual eyepieces – more than justified the added cost.
Among the trends I’m seeing more in recent ATM projects that have, so far, failed to impress me are what I call living-room-furniture projects. While I, too, admire fine craftsmanship, I see no need for mahogany, or even Baltic Birch plywood, when more humble materials will do. I prefer Bill Bradfield’s approach to ATM projects: “One doesn’t need a telescope that looks like polished chrome to discover a comet.”
I’ve a similar reaction to such innovations as wire-strung secondary mirrors. They are impressive, if only because of the difficulty with which they are implemented, but if the wires are meant to reduce the obstruction area created by traditional spider vanes, thus reducing associated diffraction spikes, I have not seen – and I’ve looked through several Dobsonians that had them – any apparent benefit. To this ATM, suspending a secondary mirror and its holder with six to eight small-diameter wires appears to make the construction and collimation of each optical tube even more complicated without benefit to cost, performance or function. When commercial telescope manufacturers start using them, perhaps I’ll change my mind, but that’s not likely.
Speaking of innovation, many of the improvements we now take for granted have come at the price of extra glass surfaces, such as those represented by the additional lens elements of our increasingly-complex and thus increasingly-capable eyepieces. Add the glass-to-air surfaces of coma correctors and filters, etc., and, well, although innovations in antireflection coatings have also delivered improved light throughput, none are 100-percent effective. The slight loss of light throughput at every air-to-glass surface still adds up, so your binoscope can use all the help it can get when trying to reach fainter objects. Rather than settle for <96% percent-reflectivity standard aluminized coatings, give your project a boost with >98 percent-reflectivity enhanced coatings to help offset the bit of light lost to all those extra lens elements. You’ll perceive a difference, if you do.
Planning and Executing Your Binoscope
Have a clear mental picture, if not detailed plans, of the binoscope you intend to build, as well as a clear understanding of how it should perform after it’s completed. Tackling challenges when they are conceptual rather than actual will save you money, labor and stress. Focus on the three fundamentals: cost, performance and function. There’ll be time for living-room-furniture levels of craftsmanship once you’ve thoroughly mastered those more essential elements.
Create a budget, and try to stick to it. Make a price list of all materials and components you’ll need to build your new binoscope, and update it as appropriate. While you’re at it, keep a list or file of potential material and component sources for future reference, and record your ideas and thoughts about the design and construction of your binoscope for future reference, as well. Once you’ve survived your first binoscope project, you’ll want to build another.
As a binoscope maker who started his first – that dual 6-inch f/15 Dall-Kirkham binocular telescope in the first image in this article – in the late 70s, I didn’t have the luxury of a computer to plan precise 3D models using Autocad or Pro-E. Instead, I drew the entire optical system to a somewhat-exact scale on a long piece of brown wrapping paper on the floor of my apartment using a tape measure, T-square and protractor. I kept working on the focal lengths, angles and placement of the optics until I was satisfied I could fit the optics within two 24-inch-long 6.75-inch diameter aluminum tubes I purchased from Jaegers.
For me, planning the optical and mechanical design, including the fork-equatorial mounting and clock-drive system, and getting it dimensionally correct to scale on paper, was every bit as important (and fun!) as subsequently crafting and assembling the actual parts.
My First ATM Binoscope

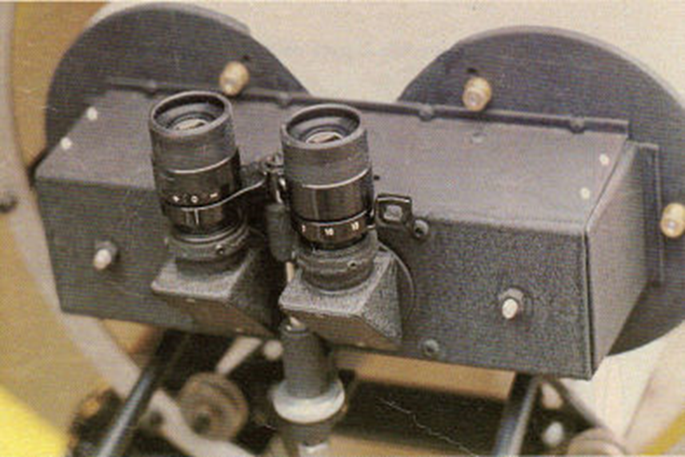
Image 2 shows my first binoscope project, the 6-inch f/15 Dall-Kirkham Cassegrain binoculars and fork equatorial mount, in full. I knew I wanted to mount the binoscope on a clock-driven fork equatorial mount, but the issue of viewing comfortably while observing various celestial objects at different positions and latitudes came into question.
It didn’t require too much head scratching to figure out a solution: a dual steel-ring 360-degree rotation system that utilized eight steel pulleys mounted on brackets to allow rotation of both optical tubes to a comfortable observing position. Because it was a 6-inch f/15 optical system, and thus capable of relatively high magnifications, I wanted to avoid having to change eyepieces in the dark when I felt the need to push the binoscope to its limits.
And so, I cannibalized the zoom eyepieces shown in Image 3 from Bushnell 7-21×40-mm binoculars to allow magnifications up to 315x with just a push of the lever, which made transitioning from low-magnification views of DSOs to high-magnification views of the Moon and planets oh-so easy. The 6-inch f/15 Dall-Kirkham Cassegrain binoculars are detailed in the November 1982 issue of Sky & Telescope, if you’d like to learn more. That build taught me lessons and habits that have served me well since, and I offer it simply as one example of addressing the three fundamentals – cost, performance and function – with innovation.
But use your own creative ideas when designing and building your binoscope. Avoid copying someone else’s. What works for them may not serve you as well. Innovate when you see the opportunity by asking yourself, “How can I reduce the cost? How can I increase its optical performance? How can I make it more functional – more comfortable to use?” Do that, and you’ll help advance the science of amateur telescope making. Indeed, you may hit upon something quite rare: an innovation so ingenious, it is eventually adopted by commercial telescope makers.
I’ve seen some scary-looking telescope and binoscope creations over the years, both at local star parties and at amateur telescope-making conferences. At worst, they were thought provoking. At best, they were inspiring.
There is no definitive scale for judging the beauty of the telescope, so I leave that to others. Instead, I focus on how each novel design performs, both optically and mechanically. Ultimately, that is how an amateur telescope or binoscope should be judged, if one must be judged at all. To each his own, and only you know what represents your ideal of form and function. Above all else, when building and using binoscopes have fun, and keep looking up!
N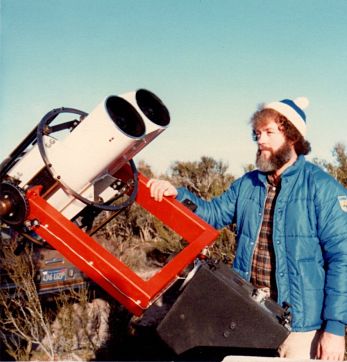 orm Butler has enjoyed amateur Astronomy for over 50 years. He served as an Opticalman on submarine tenders in the 70s and with AVCO in Hawaii in the early 80s working in astronomical engineering at Haleakala Observatory on Maui, chasing satellites, space shuttles, building electo-optical instrumentation and measuring cores of galaxies. After his astronomy and engineering career ended in the early 90s Norm relocated to Hong Kong, learned some Chinese mandarin and 16 years teaching and lecturing at the university and graduate level in Hong Kong and Shenzhen, China before retiring in 2010.