
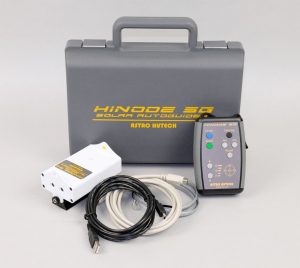
The Astro Hutech Solar Tracker, Hinode (”sunrize” in Japanese) SG, is an autoguider designed for casual solar viewing as well as photography. The Hinode Solar Guider with a dovetail bar and paddle does not require precise polar alignment, allowing for quick, convenient setup-and-go for public outreach or quick viewing with a grab-n-go solarscope. For imaging, long-term autoguiding on the sun simplifies post-processing for projects such as time-lapse movies.
In his article here, Austine Grant discusses his experiance using the Astro Hutech Hinode for solar imaging.
In the realm of astronomy, there are several “first” that are sure to leave people speechless. Being involved in astronomy outreach, I can tell you that one of the most notable ones is the first time a viewer sees the rings of Saturn. Words usually can’t describe that sense of awe and wonder.
Another is the Great Red Spot on Jupiter. We’ve all seen it in pictures, but to observe it directly is an amazing experience. Galilean moons, Iridium flares, and the International Space Station would also make the top of this list. For me, one event trumped all others, and has remained at the top of my “firsts” list. I’ll never forget my first view of the Sun through a Hydrogen-alpha telescope. Being an imager at heart, I knew instantly that I needed to be able to take images of the Sun. This, unfortunately, led to more of my “firsts,” and not ones I’d be happy to repeat.
The first time I tried to image the Sun nearly became my last time to image the sun. I didn’t yet have a Hydrogen-alpha scope, so I started with a white-light filter. It was a full-aperture filter for an 8-inch SCT; quite a bit of focal length for a beginner. To make matters worse, I only had an old dual-axis driven Celestron CG-5.
The nail in the coffin was the gusty winds, exaggerated by a bad polar alignment and a tiny CCD sensor. I spent all of my time trying to keep sunspots centered on that CCD sensor, battling drift with the hand controller the entire time. When the
processing was done, what had initially been a small field of view resulted in almost nothing to show. The stacking process works best if you crop to sections that are in all frames, and in my case, that was basically nothing. Much more luck like this, and I’d have given up for good.
Fast forward to NEAF, where I walked past the Astro Hutech booth and something new and interesting caught my eye. On display was the new Hinode Solar Guider, a standalone autoguider designed for visual observing as well as photography. I was immediately back in that first solar-imaging endeavor, and a chill ran down my spine. Sure, I’ve upgraded equipment since then, but some of those main problems will occur regardless of the gear used. Still, this Hinode was a promising tool, so as soon as they were available I picked one up.
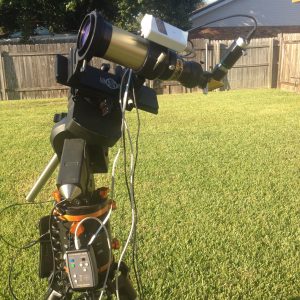
The Hinode Solar Guider from Astro Hutech arrived in a cool plastic case, with all the components you need to immediately get up and running. To be specific, that includes the optics/electronics assembly box, hand-controller, USB cable, hand-controller cable, autoguider cable, and choice of mounting base. There are three mounting bases to choose from: Universal, Lunt and Coronado. I went with the Universal base, but also added a Coronado base to use with my SolarMax II 60-mm H-alpha scope.
The fit and finish of all the parts and accessories of the Hinode Solar Guider was fantastic. The optics/electronics box was metal, as were the mounting bases. The hand-controller was made of durable plastic, so it was both strong and lightweight. Everything looked great, but I wanted to know how it set up and worked.
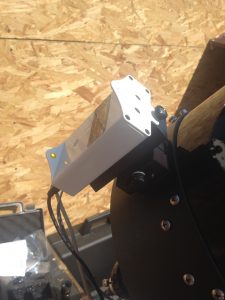
The Coronado mounting base was a snap to install. I simply removed the Coronado Sol Ranger from the clamshell and installed the Hinode base in its place. As for the Universal mounting base, I had several options for using it. It is designed to fit into a standard Orion/Synta-type finder shoe, but none of my gear had one. Instead, for whatever reason, my 8-inch Meade SCT, 11-inch Celestron SCT and ED80 all had different aftermarket finder attachments. Luckily the Universal base has bolt holes and a slotted bottom, so making it work with each of these scopes was a snap.
Once I was able to mount the optics/electronics assembly box on any scope, I attached the hand-controller. It has a nice loop at the top, and my ADM Accessories knobs on the Celestron CGE came in very handy as a hanging point. Finally, I had to connect the Hinode to my autoguider port and add power. The kit includes a USB power cable, which will probably work well for any imager, because you will already have a computer nearby. If you are using this visually or imaging without a computer, it needs a 5-volt DC power supply.
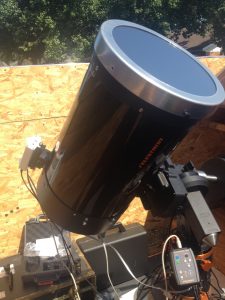
Okay, with everything connected, I was ready to go. At this point, I should tell you that my Celestron CGE is mounted on a concrete pier inside my observatory. I decided to test it there before going mobile. Because I was already polar aligned and on a sturdy setup, I wasted no time in going straight to my most challenging scope.
I mounted the 11-inch SCT and started up the computer. To actually capture images, I used the QHY5L-II from QHYCCD. The magazine has covered this camera before, and it still amazes me with its high framerate and high-quantum efficiency sensor. With everything ready to go, I powered on the Hinode.
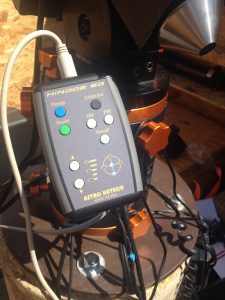
To begin, I pressed the Finder button on the hand-controller, putting the Hinode Solar Guider into Finder mode. There is a coarse-finder on top of the optics/electronics assembly, where the Sun will appear centered in a yellow circle when you are close. Once you get close, there are five directional LEDs on the hand-controller, with four outside of a centered LED. As you approach perfect center with the Sun, the outer LEDs indicate the direction you must move the scope.
It was a very intuitive process and took less than a minute to accomplish. If you are unable to see the hand-controller while centering the scope, you can press the Finder button again to activate audible feedback. Here, the pitch increased as the Sun
was centered.
The next step was to calibrate the autoguider. The instructions mention that the guide rate should be set to a low speed, but mine was already at 0.5X sidereal, so I left it alone. I simply pressed the Calibrate button and let it do its thing. The LEDs indicated which axis and direction was being calibrated, and after about 90 seconds it returned to Finder mode. From there, all I needed to do was press the Guide button, and I was off to the races.
A cool feature I discovered after the fact was that you can save the calibration for a quick startup. There are two memory positions, one for AM and one for PM. To save a calibration, simply hold down the appropriate button until a tone is heard. Then, for a quick start, from Finder mode simply press Recall and the appropriate AM or PM button. Then you are ready to guide.
The installation was easy, the setup and calibration was a breeze, and the Hinode certainly looked cool as it attempted to keep the Sun centered on my camera sensor. But how did it work? I’ll offer supporting details in a second, but I can sum it up
with a single word: Brilliantly!
With the 11-inch SCT on the already polar aligned mount, I was mainly doing battle with periodic error, sidereal-vs-solar tracking rate, and any residual polar misalignment. Using the full focal length of the scope and with the sensor cropped to 640×480 pixels for maximum framerate, an unguided image of the Sun would drift completely out of the frame in less than two-minutes. Turns out my polar alignment wasn’t as great as I thought!
Once I activated the Hinode Solar Guider for autoguiding, sunspots stayed centered indefinitely. There was some minor jostling around, but it can be attributed to scintillation. I couldn’t believe how well the Hinode worked! Still, seeing was poor, and I didn’t get any publishable images from that outing.
On my next outing, I removed the CGE from the pier and mounted it on a tripod in the backyard. This more closely resembled most of my solar outings, where I just plop the mount down and point it approximately north. This time, I mounted the 8-inch SCT, but added a Tele Vue 2.5X PowerMate to the mix. That’s 5000-mm focal length on a non-polar aligned mount! I measured drift without guiding, and it was absurd. Again, after activating the Hinode things were just…there. Right in the center, and they stayed there.
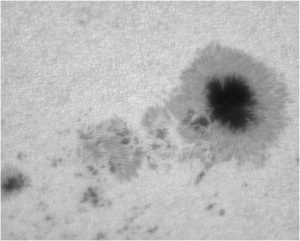
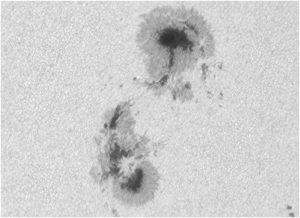
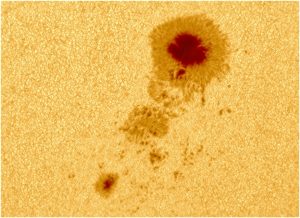
If I’d had this kind of gear from the beginning, perhaps I’d be giving Stephen Ramsden advice on solar imaging! (By the way, my friend Stephen Ramsden is the driving force behind the Charlie Bates Solar Astronomy Project, likely the largest solar-outreach program on Earth). Seriously though, the Hinode Solar Guider just plain works, and it’s simple to use. I got some nice sunspot images with excellent detail for my modest equipment.
For the next few outings, I used the Coronado SolarMax II 60-mm H-alpha telescope. I used it with and without the Tele Vue 2.5X PowerMate, and with the QHY5L-II in both full-frame and cropped mode. Because of the Hinode, the images were magnitudes more stable than ever before. More of the data could be stacked, and I ended up with more of my original resolution than I’m used to. The Hinode truly has made solar imaging more effective, and more fun.
The Hinode Solar Guider from Astro Hutech has turned out to be one of my favorite astronomy tools. It has eliminated all of the controllable sources of frustration from my solar imaging workflow. I no longer need to struggle with a compass and polar-offset charts in an effort to get perfectly polar aligned in the daytime. I no longer need to struggle with the mount hand controller, trying to compensate for drift, periodic error and backlash. All I do now is setup the mount and scope, attach the Hinode, and start imaging.
If you find yourself dealing with any of these issues during your solar outings, and I’ll bet you do, then the Hinode Solar Guider is surely a tool you need to checkout.
###
The Sun is more active than it’s been in years. And if you want to know your equipment options from solar glasses to the most out of this world solar viewing and imaging options, check out our free publication – The Definitive Guide to Viewing and Imaging the Sun – simply click here and enjoy reading!
And to make it easier for you to get the most extensive news, articles and reviews that are only available in the magazine pages of Astronomy Technology Today, we are offering a 1-year magazine subscription for only $6! Or, for an even better deal, we are offering 2 years for only $9. Click here to get these deals which only will be available for a very limited time. You can also check out a free sample issue here.
 By Austin Grant: Austin Grant, a high-school Chemistry and Biology teacher, is a self-described perpetual hobbyist, experienced in such areas as building computers and repairing arcade equipment. Austin stumbled into astronomy several years ago and it soon became his primary interest. Being a child of the digital age, it didn’t take long for him to find digital astro-imaging and he sold his last pinball machine to fund his current imaging rig. Austin shares his passion for stargazing with his students and is in the process of building a school astronomy club.
###