Paramount MYT Robotic Telescope Mount: I was the observatory director for the Kaua`i Educational Association for Science and Astronomy (KEASA). We shared our observatory complex with Kaua`i Community College.
The complex consists of a roll-off-roof observatory, a building with a 10-foot diameter Ash Dome, and a Sky Shed Pod with three bays. The roll-off-roof observatory, built in 1990, is a 48 x 24 foot building where half of the roof rolls underneath the other half. The half with the permanent roof contains a classroom for meetings and equipment storage.
The observatory originally had a single pier on a raised deck with a Celestron C-14 telescope on a homemade mount and pier. Approximately 10 years ago, a second pier was installed for a Celestron C-11 on a CGE Pro mount. The Celestron telescopes have since been replaced with a PlaneWave Instruments 17-inch Corrected Dall-Kirkham (CDK) Cassegrain telescope on a Paramount ME II German equatorial mount and a RCOS 12.5-inch Ritchey-Chrétien Cassegrain telescope on an Astro-Physics 1200 German equatorial mount.
I expanded the raised deck to allow more elbow room around these large instruments and added a third pier to hold a smaller 8-inch Ritchey-Chrétien telescope. I repurposed the old CGE Pro mount to use with the 8-inch RC while contemplating what mount to permanently use on the new pier. The 8-inch RC with the CCD camera, guidescope, guider CCD camera, and finderscope, combined weigh just under 50 pounds. So I needed a mount that could carry this payload.
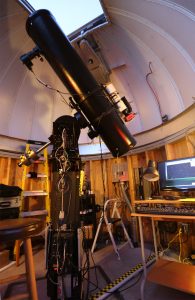
I have had a lot of experience with Astro-Physics and Software Bisque (maker of the Paramount line) mounts over the years. Both are excellent. The 10-foot domed observatory I mentioned above houses a Discovery 10-inch f/6 Newtonian (see ATT Volume 9, Issue 5) on a Paramount ME mount (Image 1).
The mount is 15 years old and still works like new. We have had no problems with it (knock on wood!) The Astro-Physics 1200 mount is near the same age and also in excellent condition. When we bought the 17-inch CDK, we purchased a Paramount ME mount for it. In 2016, we traded up to the ME II (Image 2).
I could have purchased a Paramount MX+ or an Astro-Physics 1100 for the new pier. They have payload ratings of 100 lbs and 110 lbs, respectively. Normally, I don’t like to exceed 50% of a mount’s payload specifications for serious astro-imaging. But I wanted to keep the cost down and wanted a mount that I could easily remove and set up on a tripod if I needed to use it at a different location. These two models seemed a bit heavy for that.
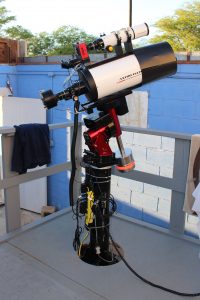
I next considered the Astro-Physics Mach 1 and the Software Bisque Paramount MyT (Image 3). Both sell for around the same price

and have nearly the same payload rating: 45 lbs for the AP and 50 lbs for the MyT. I decided to go with the Software Bisque Paramount MyT due to its slightly higher payload and because it is packaged with the amazing Sky X Professional software. More on the software later.
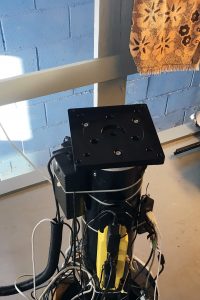
The Paramount MYT Robotic Telescope Mount came nicely packed in foam and plastic. The software came on a large a capacity thumb drive in the same box. I also ordered a Bisque pier plate for the mount since I was using my own pier, not one from Bisque.
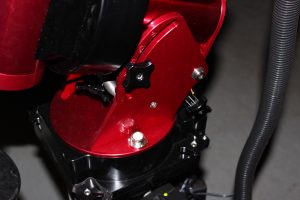
My pier is a 6-inch Le Seur Astro Pier with an insert adapter for the old C-14 wedge. Fortunately for me, Bisque’s plate comes pre-drilled to use with various commercial tripods. Three of the Bisque plate’s holes exactly matched the top of my pier adapter (Image 4)!
Once I attached the plate to the pier adapter, I lifted the mount onto the plate and attached it to the plate with the four supplied hand-
turned screws. Since the mount only weighs 34 lbs, I required no assistance to lift it up. I then leveled the mount using leveling bolts at the base of the pier and the mount’s built-in bubble level (Image 5).
Next, I did a rough polar altitude adjustment. The mount’s altitude can be set from 0 to 64 degrees. On the side of the mount are large tic marks and numbers every ten degrees, with smaller tics every two degrees in between.
My latitude is 21° 59′, so I first I moved the horizontal bar into the appropriate slot just below my 22° latitude mark. Then using the fine polar altitude knob, I raised the mount to near 22 degrees. The final polar alignment would be done with the telescope.
I then attached the counterweight shaft and two 20 lb counterweights (Image 3). The mount only comes with one 20 lb counterweight, but I had several spare ones for the Paramount ME mount in the dome (Image 1), which uses the same counterweights.
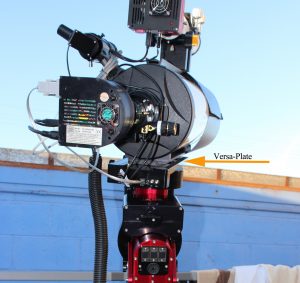
The last piece to add to the mount was the Versa-Plate (Image 6). Four ¼-20 bolts hold the plate to the mount. The Versa-Plate holds
the telescopes dovetail plate to the mount. Image 6 shows the 8-inch RC telescope and piggyback 70mm Apo refractor attached to the Versa-Plate.
Like all of the Paramount models, the Paramount MYT Robotic Telescope Mount has through the mount cabling to an instrument panel located below the Versa-Plate. The instrument panel has jacks for Aux Power, two mini USB ports, autoguider, focuser, and 5V and 12V power ports.
I am using the two USB ports for the two CCD cameras and the autoguider port. Since my SBIG ST-2000 CCD camera has a unique 5-pin power cord, I cannot use the supplied power on the instrument panel for it. So I have a series of cables running to the telescope
running power up to the CCD cameras and motor focus, and a third USB cable to control the focuser on the RC-8.
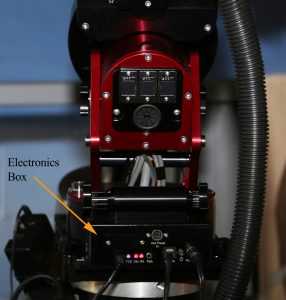
Image 7 shows the Paramount MYT Robotic Telescope Mount Electronics Box and the through-the-mount cabling. The Electronics Box includes the mount power switch, USB 2.0 cable input, status lights, ports that can be used to run power through the mount to the Instrument Panel, a hardware park port and jack for the mount’s joystick.
Inside the Electronics Box is the Bisque MKS 5000 motor control system. I have three things plugged into the MyT’s electronics box: a USB cable running to the computer to control the mount and cameras, a Paramount joystick, and the 48V power supply that comes with the mount (and uses 110V AC).
Older Paramounts came with a real joystick to slew the mount at various speeds in both right ascension and declination directions.
Double clicking the button on top of the joystick homes the mount. The new Paramount MyT instead comes with a very simple hand controller that has the same functions.
I prefer the joystick so I am using one from an older Paramount with the MyT. Software controlling the mount can do everything the joystick can. The only advantage of the joystick is not having to have a computer within reach of the mount to manually slew it.
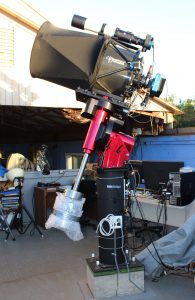
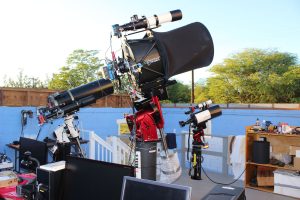
Assembling the Paramount MYT Robotic Telescope Mount, telescopes, cameras and all the cabling took under two hours! Image 8 shows the completed set up. Image 9 shows all three mounts under the KEASA roll-off roof observatory, The Paramount MEII, The Astro-Physics 1200 and the Paramount MyT.
I mentioned earlier that one of the perks about buying a Software Bisque mount is it comes with the SkyX Professional Edition (SkyX
Pro for short) software. This amazing software has a planetarium-like chart and can control a telescope mount, imaging still or video camera, autoguider camera, dome or roll-off roof, focuser, and focuser rotator.
Any ASCOM compliant hardware in the above categories should have no problem communicating with the SkyX Pro. The software comes on a thumb drive with Macintosh and Windows versions.
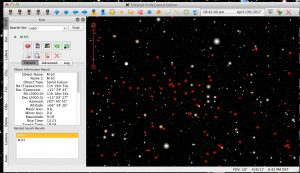
Let me start off with the little that I don’t like about the SkyX Pro. Image 10 shows a sample of the display after launching the SkyX Pro and centering the field on M65. The symbols used for galaxies (red spiral icons seen in Image 10), open star clusters, globular star clusters, planetary nebulae, etc., do not conform to the normal symbols seen star atlases such as Norton’s Star Atlas, Millennium Star Atlas, or Star Atlas 2000.
That’s why I prefer the charts on Carina Software’s Voyager 4.5 better. Voyager 4.5 uses the normal symbols plus the size of the symbol on the screen is proportional to the size of the deep space object. When zooming in Voyager 4.5, the symbol zooms proportionally until it give way to a picture of the object. In The SkyX Pro, the symbols stay the same unproportional size no matter what the field of view scale is. The default settings in SkyX Pro have no R.A. or Dec lines or numbers nor any constellation
information on the chart screen. But those can be turned on!
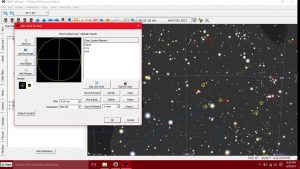
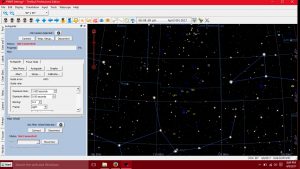
The good news is SkyX Pro has a symbol editor to allow users to create different shapes and colors for any chart object. Image 11 show the symbol editor where I have just created a new symbol for globular clusters. In this image, the sky chart is centered on M22 (Messier numbers turned on in red). There are many globular clusters (circles with crosshairs) in the region, along with open clusters (open circles) and planetary nebulae (green circles with four spikes coming out of them).
The symbols are not proportional to the cluster sizes, but they at least they are the symbols I am used to. Zooming in does not change
the symbols size, but at some point the symbol gives way to an image of the object, as it did for M25 in this chart view. Note I have also turned on R.A. and Dec lines and labels, and blue constellation lines. In this view, part of the Teapot asterism is visible. I could have turned on a gambit of other labels (star names, NGC numbers, etc.), but didn’t because at some point the charts get too cluttered.
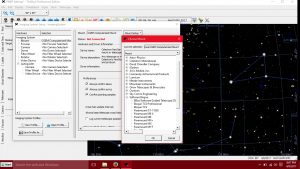
Setting up the hardware is pretty simple. Image 12 shows on the left the different types of hardware that can be configured. On the right I have opened up the mount setup window and scrolled down to Software Bisque mounts to select the Paramount MyT. It’s that
simple for cameras and other hardware. Most makes and models of equipment can be found in the SkyX Pro!
On Image 13, I have pulled down the Display menu where at the bottom are the various control and data windows that can be opened. Those with check marks have a tab visible on the left side of the window for quick access. Many of the control windows can be configured to have user-selected element visible in them! Also note the icons along the top of the SkyX Pro window. There are hundreds of toolbar and icon combinations that can be made visible there.
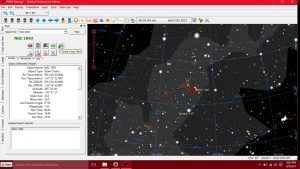
I will now discuss a few of the SkyX Pro features I use the most. First on Image 14, I have opened the Find window and I found NGC1893 in Auriga. Note the five icons in the row below the green NGC1893. The red target-symbol centers NGC 1893 on the chart.
The fourth icon in that row, i.e. the green target symbol, is used to request a Slew to NGC1893. The right-most icon is for Close Loop Slews. When selected, the telescope will slew to the object, take a predetermined length image with the camera, if connected, and then compares the image to the chart. It then centers the telescope exactly onto the object and takes a second image to show that the object is now centered. Pretty cool! Below all the Find window icons is a list of information on the selected object.
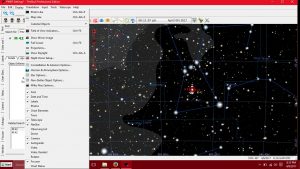
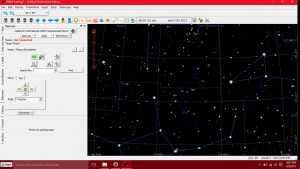
Image 15 shows the Telescope control window. From this window, you can still search for and find objects, slew to them or do a closed loop slew. The four green arrows allow the mount to be jogged a set distance in R.A or Dec, or just slewed with mouse clicks at a user-selected speed. Note on the chart the oval galaxy symbols I created, which I have color-coded to indicate the galaxy type (spiral, elliptical, lenticular or irregular).
The Camera control window is shown in Image 16. There are myriad settings available for exposing single or a series of images. Filter wheels control is also in this window. The Autoguider control is shown in Image 17. Like most camera control software, the
autoguider must be calibrated. Guider images and a graph of guider errors can be displayed.
One of the best add-on features in the SkyX Pro is the T-Point software. T-Point is used to create a mount model to improve the accuracy of finding targets. A minimum of six stars is required for a basic mount model. I find that a 20-30 star model gets most objects close to centered on my CCD camera with my 8-inch Ritchey-Chrétien telescope.
For our 17-inch telescope on the Paramount MYT Robotic Telescope Mount, we have a 200 star mount model. Fortunately after six stars are obtained, the
software will complete the mount model on its own as long as the camera is active.
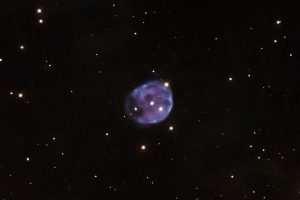
So how well does the Paramount MYT Robotic Telescope Mount perform with the maximum payload installed? Image 18 is a 90-minute exposure (9 x 10 minutes) of NGC246 taken with the RC8 telescope and an SBIG ST-2000XCM CCD camera. A 0.8x focal reducer/field flattener was employed yielding a focal length of 1321 mm. Tracking with the camera’s guide chip was great, yielding round stars throughout the field of view. NGC 246 is a magnitude 10.4 planetary nebula in the constellation Cetus. The nebula has a diameter of 4 arcminutes.
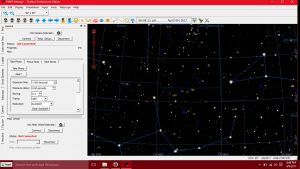
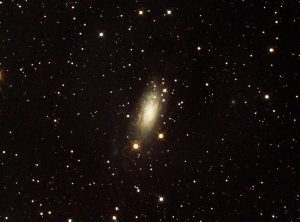
Image 19 is a two-hour exposure of the spiral galaxy NGC3621 using the same equipment, also with 10-minute subframes. This magnitude 9.5 galaxy is in the constellation Hydra.
These images show that Paramount MyT is indeed a mighty mount for astro-imaging carrying a payload close to 50 pounds. I am quite pleased with the performance of this mount and look forward to many years of imaging with it!
By Dr. James Dire: James Dire has an M.S. degree in physics from the University of Central Florida and M.A.and Ph.D. degrees from The Johns Hopkins University, both in planetary science. He has been a professor of physics astronomy at several colleges and universities. Currently he is the Vice Chancellor for Academic Affairs at Kauai Community College in Hawaii. He has played a key role in several observatory projects including the Powell Observatory in Louisburg, KS,which houses a 30-inch (0.75-m) Newtonian; the Naval Academy observatory with an 8-inch (0.20-m) Alvin Clark refractor; and he built the Coast Guard Academy Astronomical Observatory in Stonington, CT, which houses a 20 inch (0.51-m) Ritchey Chrétien Cassegrain.