
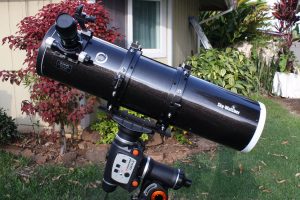
Sky-Watcher Starlux 190MN Review: I have a 6-inch f/6 Newtonian and a 6-inch f/6.5 achromat refractor that I use entirely for visual use. I invested around $300 in the Newtonian and $700 in the refractor. Both are great instruments for their price. However, the Newtonian’s mirror does not have the greatest figure. Stars appear much shaper in the refractor. My refractor has great optics but suffers severely from chromatic aberration since neither element contains ED (Extra-low Dispersion) glass.
 For these reasons, I have been considering the purchase of a 6-inch apochromatic (apo) refractor.
Six-inch Apos with high quality glass cost between $6000 and $9000. That’s a lot. Since I haven’t won the lottery, I wasn’t quite sure I wanted to invest that much. I knew the views would be substantially better than either of my current 6-inch telescopes, but I kept weighing whether the difference is worth an investment tens times greater than my current refractor.
Then it hit me, I should invest in a Maksutov-Newtonian (Mak-Newt for short) instead. Mak-Newts are reputed to perform like an apos, at a fraction of the cost for the same aperture size! Fortunately, Sky-Watcher sells a 190mm f/5.3 Mak-Newt for $1500. This is a 7.5-inch telescope for a fraction of the cost of a 6-inch apo.
Mak-Newts are a telescope design that use both a lens and mirrors. The mirrors are configured like standard Newtonians, except whereas standard Newtonians have a parabolic primary mirror, Mak-Newts use a spherical primary mirror. Spherical mirrors are easier to make than parabolic mirrors, but suffer from spherical aberration.
So Mak-Newts have a meniscus-shaped lens at the end of the optical tube that eliminates this aberration. Mak-Newts have one-fourth the coma of straight Newtonians. Like refractors, then suffer from field curvature. But this too is minor compared to refractors. Finally, the secondary mirror in Mak-Newts is attached to the corrector lens, eliminating the four-vane spider that causes diffraction in standard Newtonians. Thus Mak-Newts can perform like apos.
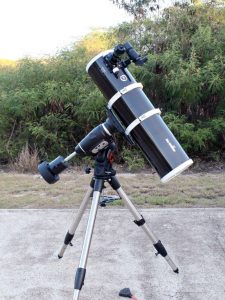
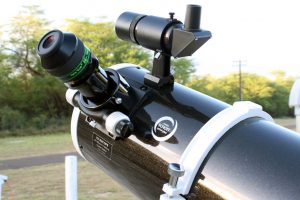
Image 1 shows my newly purchased Sky-Watcher Starlux 190MN, a 190mm f/5.3 Mak-Newt. The optical tube assembly (OTA) comes with a set of tube rings, a Vixen-style dovetail plate and an 8x50mm right angle finder scope with mounting bracket.
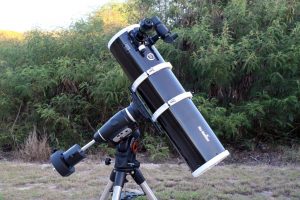
As shown closer in Image 2, I have swapped out the Vixen-style dovetail plate for a Losmandy-style dovetail plate to use on my Celestron CGEM II mount (see ATT Volume 11, Issue 1). With it and my 26mm Tele Vue Nagler eyepiece, the

entire payload weighs 33 pounds. Although Mak-Newts are heavier than comparable sized traditional Newtonians, this total weight is well within the 40-pound payload rating for this mount. The two counter weights on the mount (Image 2) total 31 pounds.
The meniscus-shaped corrector lens and inside of the OTA are visible in Image 3. Everything about the OTA is beautifully machined. The corrector lens has high contrast coatings and is made with Japanese Schott glass. The inside of the tube is flat back and baffled to improve contrast. The primary mirror is 190mm (7.48 inches) in diameter. The central obstruction from the secondary mirror and mirror assembly is 51mm in diameter. That’s 26.8% by diameter or 7.2% by surface area.
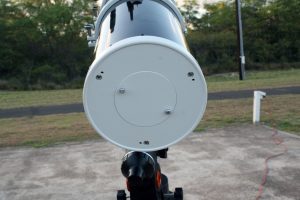 What this means is that the Sky-Watcher Starlux 190MN has the same light gathering power of a 183mm (7.2 inch) refractor. The secondary is small enough not to block an excessive amount of light or cause unreasonable diffraction, but large enough to illuminate most CCD camera chip sizes.
Although not visible in Image 3, the primary mirror is center marked to aid in collimation. After travelling all the way from California to Hawaii, I did not expect the telescope to be in collimation when it arrived. A star test showed it was slightly off. I used my laser collimation tool to first collimate the secondary and then the primary mirror. The procedure was the same as collimating a standard Newtonian. After collimating, the star test was perfect.
Collimating the secondary required popping off the secondary assembly cover (see Image 3) in the middle of the meniscus corrector. I took care not to touch the lens while doing this so as not to scratch it or get finger smudges on it. Under the cover are three collimation screws and a locking screw. The telescope comes with a small Phillips screwdriver to turn the screws. I found the screws a little difficult to turn, but I got the job done.
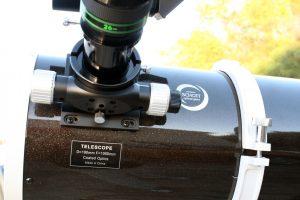
The back of the Sky-Watcher Starlux 190MN OTA is shown in Image 4. The primary mirror is collimated with the same screwdriver with the three screws shown in the image. Note the small holes next to the three Phillips screws. Before adjusting the primary mirror, a supplied Allen wrench must be used to in the three holes to back out the mirror lock screws. Once collimated, the Allen screws hold the primary mirror’s alignment.
The two thumbscrews on the back of the tube allow removal of a small circular plate to allow for active (with the addition of a fan) or passive mirror cooling. With a mirror this small, passive cooling for 30-60 minutes should be sufficient, even with the enclosed front end of the tube.
I set up the Sky-Watcher Starlux 190MN just before sunset with the sun behind trees. By the end of astronomical twilight, the optics appears to be at ambient temperature. I would not add a fan because blowing air into the OTA will introduce dust. A closed system like a Mak-Newt should never need mirror cleaning!
The Sky-Watcher dual speed focuser is shown up close in Image 5. The two silver knobs provide course focus, while the black knob on the right is the 11:1 fine focus. There is a locking thumbscrew on the bottom of the focuser. While the
focuser works well and seems to be pretty solid, when the lock screw was loose the weight of the eyepiece would cause it to move inward. All the way tight, the lock screw kept the focuser in place. However, it was not easy to adjust the tension for any in between motion. The length of the drawtube was quite small, and the focuser range was also small.
Whereas most standard Newtonians position the focuser for visual use, sometimes requiring the mirror cell to be moved up in the tube an inch or two for imaging, the position of the focuser in the Mak-Newt was designed for imaging cameras. Therefore, an extension tube is required to use the telescope with an eyepiece.
Fortunately, the Sky-Watcher Starlux 190MN focuser comes with a built in 55mm long extension tube. The setscrew on the right side of the focuser in Image 5 is used to unlock and lock the extension tube. The setscrew on the left, top side of the
extension tube is used to secure the eyepiece with the built-in compression ring. The extension tube can be extended any fraction of its length and seems pretty secure when locked tight.
Image 6 shows the extension tube fully extended. In general, the focuser is much better than I was expecting. The draw tube has very little flex and rolls quite smoothly. However, if I ever decide to put the telescope into full-time imaging operation, I would probably upgrade it to a Moonlight or JMI focuser with a longer drawtube.
My first night out with the telescope, I put the telescope though a rigorous visual test. After polar aligning the mount and performing a 6-star alignment model, despite the heavy payload and high moment of inertia around the declination axis, the mount got every object I requested into the eyepiece.
My first target was Jupiter. The seeing was around 2-3 arcsec. With my 13mm Ethos eyepiece (77x), the view was superb.

The belts, zones and Great Red Spot were easily resolved. The four Galilean moons were resolved into disks. The seeing wasn’t quite good enough to advance up to my 5mm Nagler eyepiece (200x), so that will give me something to look forward to on a better night.
I next did a sweep of globular star clusters M3, M5, M53, M13 and Omega Centauri, which was 25 degrees up in the south. The number of resolved stars, sharpness and contrast were as good as any 5-6 inch Apo! With the light gathering power of a 7.2-inch refractor, I next went deep hunting galaxies.
M51 was my first target. I could make out its spiral arms, albeit with averted vision. I next went to M84 and M86 and could trace out all of Markarian’s chain, jumping from there to M88. I could spy much fainter galaxies than in my 6-inch refractor. M81 and 82 were a sight in the same eyepiece, as well as the Leo Trio (M65, M66 and NGC 3628).
Visually, the Sky-Watcher Starlux 190MN was everything I expected. The only issue I had was that even with the focuser extension fully extended, it was not enough for several of my eyepieces. Therefore, I had to use an additional one-inch extender I had in my equipment case.
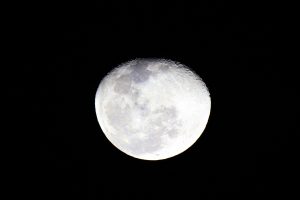
Next, I hooked up my Canon T3i DSLR camera using a T-ring and 2-inch nose plug, slid right into the focuser. I set the mirror lock up feature in the camera settings to eliminate vibrations during exposures and took some pictures of the 18 day-old moon. Image 7 shows a 1/100s exposure. The Moon’s diameter fills up about 35% the width of this imaging chip. The sharpness of the craters on the terminator testifies to the telescope’s optical quality.
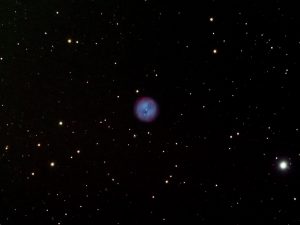
I conducted further imaging of deep space objects with the 190mm Mak-Newt using an SBIG ST-2000XCM single shot
color CCD camera. The chip is this camera is smaller than the Canon, but it is still my favorite camera for imaging due to the internal guide chip and ease of use. My first target was M97, the Owl Nebula (Image 8). The exposure was 80 minutes. The stars are sharp and round all the way to the edges of the field of view in this uncropped image.
Following that, I shot M100 (Image 9). The fast f/5.3 focal ratio of this telescope let me capture this image with a 60-minute exposure. Note several smaller faint galaxies scattered around this image. This image captured galaxies fainter than magnitude 16!
One final issue that I want to address is the comfort of viewing with a telescope. Long focal length refractors require sitting, when viewing object high above the horizon and standing when viewing objects low in the sky. With my 910mm
focal length refractor, I sometimes sit on the ground to view objects at the zenith. Also, with a German equatorial mount, the diagonal needs to be rotated quite often when slewing to different locations.
With a Newtonian, I like to stand when viewing, and can do so whether spying objects low in the sky, or high overhead. The problem with a Newtonian on a German equatorial mount is the eyepiece is not always at a location comfortable for viewing. This problem can be solved with rotating tube rings. Since I purchased the 190mm Mak-Newt for visual use, I decided to invest in a high-quality set of rotating tube rings.
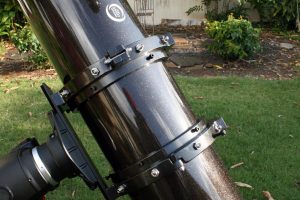
For rotating tube rings, I decided to contact Joe Nastasi at Parallax Instruments. I have been doing business with Joe for nearly two decades. Although they make excellent telescopes, Parallax Instruments is best known for their high quality, rugged telescope rings. Their rotating rings are no exception. I was glad to find out they already made rings for the Sky-Watcher Mak-Newt, although they had to be custom ordered. Three weeks later for $590 shipped, I had my new rotating tube rings (Image 10).
Comparing the telescope’s rings in Image 2 to the Parallax rings in Image 11, it is obvious the Parallax rings are much more massive. The Parallax rings weigh 11.5 pounds for the pair, compared to 3 pounds for the Sky-Watcher set.
To minimize the mount’s payload, I swapped out the 8×50 finder scope for a red dot finder (shown in Image 10). My OTA with the new rings, new finder and 26mm Tele Vue Nagler eyepiece now comes in a few ounces under 40 pounds, still under (barely) the mount’s maximum rating. With the new rings, I had to add an additional 5 pounds of counterweight to balance the OTA.
The 40-pound payload limit on my mount is mostly due to the tripod. The single set-screws holding each leg when extended cannot handle greater weight. Fortunately, with the Sky-Watcher 190mm Mak-Newt, I do not need to extend the tripod legs at all to comfortably use the telescope while standing. After balancing the mount, the mount’s motors had no difficulty operating with this nearly 40-pound payload!
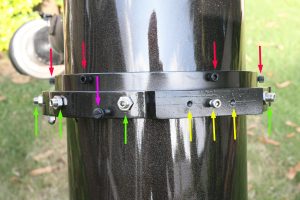
A close up shot of the Parallax rotating rings appears in Image 12. The yellow arrows show the three ¼-20 tapped holes on the top of the rings. Per my custom order, they are spaced one inch on center. The ring’s bottom has the same, which allows them to bolt to the D-style Losmandy dovetail plate where the holes are two-inches apart.
The red arrows show the plastic screws that hold the OTA to the rings. There are six on each ring. The screws can be used to collimate the rings with the telescope’s optical axis. The green arrows show the screws that set the tension on the bearings. Again, each ring has six of these screws. The factory setting for those screws seemed just right, so I did not mess with them.
Finally, each ring has a plastic thumb-turn-able locking screw indicated with the pink arrow. After rotating the telescope’s eyepiece to the best viewing location, this screw on each ring can be hand tightened to prevent the rings from rotating while viewing through the eyepiece.
The rings worked perfect. Rotating the rings by gripping the tube was quite easy and did not cause the telescope to move off of the sighted object one bit. My total expense for this telescope system, not counting the eyepieces or mount, was approximately $2000 plus shipping.
So, for approximately 1/3 the cost of a low-end 6-inch apo, I have a larger aperture telescope with apo-like performance with rotating tube rings. This will be my primary observing instrument for many years to come for nights when I want to have GOTO mount operation and high power, tracked image viewing.
 James Dire has an M.S. degree in physics from the University of Central Florida and M.A.and Ph.D. degrees from The Johns Hopkins University, both in planetary science. He has been a professor of physics astronomy at several colleges and universities. Currently he is the Vice Chancellor for Academic Affairs at Kauai Community College in Hawaii. He has played a key role in several observatory projects including the Powell Observatory in Louisburg, KS,which houses a 30-inch (0.75-m) Newtonian; the Naval Academy observatory with an 8-inch (0.20-m) Alvin Clark refractor; and he built the Coast Guard Academy Astronomical Observatory in Stonington, CT, which houses a 20 inch (0.51-m) Ritchey Chrétien Cassegrain.
And to make it easier for you to get the most extensive telescope and amateur astronomy related news, articles and reviews that are only available in the magazine pages of Astronomy Technology Today, we are offering a 1 year subscription for only $6! Or, for an even better deal, we are offering 2 years for only $9. Click here to get these deals which only will be available for a very limited time. You can also check out a free sample issue here.