
 By Dave Snay
David Snay is a retired software engineer living in central Massachusetts. He graduated from Worcester Polytechnic Institute and has been an astronomer and astrophotographer for more than 15 years. David currently pursues fine art photography, specializing in traditional black/white images. He also is involved in solar outreach.
Ron Burrows has been designing and building stunning telescope eye piece cases and Catsperch at the observing chairs for many years. He’s been a fixture at NEAF as long as I can remember. The craftsmanship exhibited by Ron’s work is absolutely wonderful. Along with the beauty of his work comes rock solid performance.
He offers an imaging workstation that is extremely well designed. It’s a collapsible table with an enclosure to both protect your computer and shield neighboring astronomers from the light of your monitor. It also has a shelf below the table for easy access to your mouse, or whatever you might want to keep handy.
There are two versions, one has a black cover and one has a white cover. The white cover is actually two pieces. One is more or less permanently attached to the enclosure and the second piece attaches around the opening and extends down the front, covering the enclosure completely.
It’s designed to allow you to work under the hood during the day for solar observing and imaging as well as completely covering the enclosure. The black cover is stiffer and does not extend over the opening. It does not cover the entire enclosure, but Ron assures me that if you use a red acrylic cover on the PC monitor and keep the interior red LED’s set appropriately you won’t hear any complaints on the field.
I chose the one with the white cover since I do both solar and deep sky imaging and really like the idea of having a white hood to
help keep me from broiling under the sun. I also like the lighter weight fabric more than the stiffer black one. It really is just a personal preference though.
I ordered my workstation and it arrived at my house just two weeks later. I was initially surprised at the small size of the packaging. It was only two small boxes. I thought, “Hmm, how did Ron get the whole thing in there?” Well Ron’s design for portability worked out great for shipping too. Everything folds down into nice flat shapes, making it easy to pack.
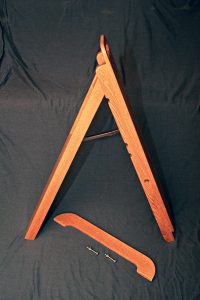
Image 1 shows the base for the workstation. It folds down to about 4” thick. Notice the locking hinge about half way down the
legs. It keeps things from collapsing unexpectedly, yet unlocks and folds easily when you want it to. The cross bar is held in place at the foot of the forward leg to provide side support and is held in place by the two bolts you see in the picture.
The table enclosure and the shelf are held in by simple leverage. There are notches in the back of the front leg that the nubs at the rear of the enclosure and the shelf lock into while their weight keeps the solid dowel in front of the leg in place. Just don’t lift the workstation by the enclosure. There’s even a handle built into the support legs for that.
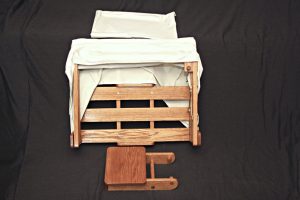
Image 2 shows the table, hood and shelf of the workstation. The first time I assembled the workstation I thought I had to slide the table and shelf from the bottom because of the hinge at the top. That was silly on my part. Ron showed me that they easily mount from the top. Even doing it the hard way, it still only took me 3 minutes to assemble the whole thing.
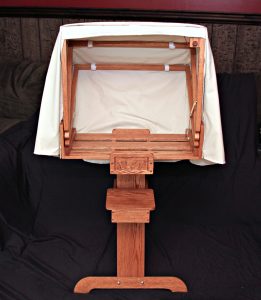
Image 3 shows the workstation fully assembled and ready to go. Check out the detail work Ron added to the front of the table.
He even added a small shelf for your mouse, coffee or whatever else you might need close at hand when in the field. There are two notches in the back of the front support leg that you can use to place the shelf at just the right height for your comfort.
If you look closely at the picture of the fully assembled workstation, you’ll see a little wire in the top right corner of the enclosure. That connects the red LED’s in the enclosure to a 9-volt battery held in a clip right up there. When I first connected the wire to the battery and the lights came right on, I thought that it would be nice to have an on/off switch with a dimmer. Well, see the little wooden knob right in front of the wire? That’s what that is. Ron thinks of everything!
You can have your workstation coated with a clear coat or you can choose from 21 Minwax stains for a small additional fee. I chose Early American and I am very happy with the results. The finish is perfect.
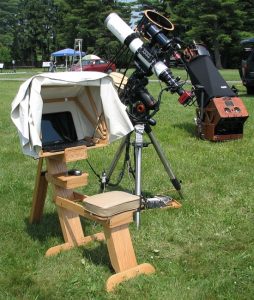
There is also an option for a padded chair that attaches to the support. Images 4 and 5 offer is a picture of Ron’s workstation
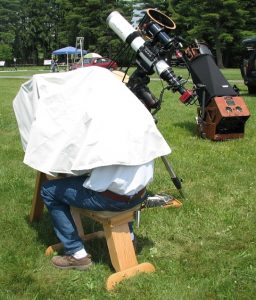
with the optional chair and one with Ron under the hood. Pretty sweet, don’t you think? The table is the same height as a kitchen table at 30″ so you can use most any chair.
You can find Ron’s handiwork at www.wood-wonders.com or you can contact him via email at ron@wood-wonders.com. He’ll respond quickly and is very helpful when choosing your options. If you visit his web site you’ll see his other products as well.
I’ve only been able to use my workstation a few times so far, but I can already tell it’s extremely well made and very functional. I’ve use it with and without the front cover. I don’t have any red acrylic but I turned the screen red using the night vision mode of my software and as Ron predicted, there is very little light emanating from the front of the enclosure without the front cover. With the front cover in place, there is absolutely none. I have no doubt my workstation will provide many years of service.
###
 The Astronomy Technology Today editorial staff would like to take this opportunity to remind you of the availability of our Solar eclipse equipment guide – The Definitive Equipment Guide to the 2017 Solar Eclipse. Our goal with the 40-page publication is to provide an easy-to-consume introduction to the technological options for viewing and imaging the Great Solar Eclipse. We cover the gamut of options available including building your own solar viewer, solar glasses, smart phones, DSLR cameras, using astronomy telescopes, solar telescopes, using binoculars, solar filters (including a DYI filter option), CCD astro cameras, astro video cameras, webcams and much more. You can view the guide on our website here – its free and there is no requirement to sign up to read the guide.