
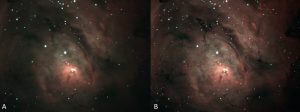
Live High Dynamic Range (LHDR) techniques for video astronomy were discussed in the Issue 3, 2019 edition of Astronomy Technology Today. In it, techniques were presented that enabled video astronomers to access faint detail without overexposing bright areas … even before any postprocessing took place. In other words, these were techniques that could expand a view’s dynamic range during a viewing session.
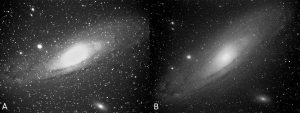
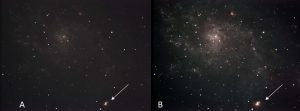
Image 1A) Messier 31, 32, and 110, color adjusted in Windows 10 Photos, with live-stacked 7-second exposures using fixed gain and 2×2 binning. Image captured by Matt Harmston using a MallinCam DS10c and SkyWatcher 100ED Pro at f/6.
1B) Messier 31, 32, and 110 in Live HDR, processed in Registax and Windows 10 Photos, using 10 second exposures and 2×2 binning with gain ranging from minimum to maximum values during the live stack. Image captured by Matt Harmston using a MallinCam DS10c and SkyWatcher 100ED Pro at f/6.
Why care about dynamic range? Well, how many of us have pointed our cameras to Messier 31 (the Andromeda Galaxy) and ended up with an overexposed core (see Image 1A), yet hoped for a little more detail similar to the LHDR Image 1B?
The earlier article discussed Jim Meadow’s innovative introduction of live stacking frames with fixed exposure length and gradually increased gain as the stack grew (see http://remotevideoastronomy.com/blog/ds10c-live-hdr-averaging and http://remotevideoastronomy.com/blog/ds10c-live-hdr-averaging-part-2) . Similarly, the ATT Issue 3 article took the technique further to discuss extending exposure times (whether in video or “trigger” mode) to increase illumination as stacks were built. In the end, the author hoped that the basic techniques would be ones with which video astronomers could experiment and arrive at images with a broader dynamic range … all within a viewing session.
We can attest to the fact that many fellow amateurs did indeed experiment (and succeed) with the LHDR techniques. We have personally created LHDR images using telescopes ranging from 80mm refractors to 14-inch SCTs, and have been in communication with users applying the techniques in tracking Dobsonian-mounted Newtonians up to 22”. Some have used smaller push-to dobs, while others have leveraged telescopes on entry-level non-goto and ultra-high end goto mounts.
That we know of, camera chips have ranged from approximately 6mm on diagonal to over 21mm. Whew … that’s a lot of useless detail. The bottom line, LHDR techniques are being used successfully with a wide range of equipment price points, gear styles, and by folks representing equally wide ranges of experience.
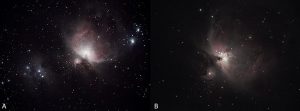
2A) Orion’s sword in Live HDR, processed in Registax and Windows 10 Photos, using live-stacked 10 second exposures and 2×2 binning with gain ranging from minimum to maximum values during the live stack. Image captured by Matt Harmston using a MallinCam DS10c and SkyWatcher 100ED Pro at f/6.
2B) Messier 42 and 43 in Live HDR, processed in GIMP, using live-stacked 5 second exposures and no binning with gain ranging from minimum to maximum values during the live stack. Image by Matt Harmston captured using a MallinCam DS10c and SkyWatcher 100ED Pro at f/9.
With this widespread use of techniques came many questions, discussions, and ultimately, innovations. The purpose of this article is to discuss some of the strengths inherent in varied gain and exposure settings for LHDR, as well limitations that have been uncovered. In turn, we will also discuss a new, efficient workflow that both circumvents some limitations and is applicable across cameras whose software permits live stacking and histogram control.
LHDR Using Gain and Exposure: The Good, Bad, but Hopefully Not Ugly
The degree with which video astronomers can explore night sky detail during a viewing session is quite impressive. We hesitate to refer to “real-time” viewing because the concept can be quite value-laden. Rather, our interest is in what users will see in the field, rendered onscreen during their astronomy sessions, with maybe a hint of intent to save an image for later post-processing. After all, revisiting images gives us something to do under our ubiquitous cloud cover. Leveraging common camera characteristics, onscreen views (and subsequent image snaps) are taking on new dimensions. From our time battling the cold, clouds, and cadre of biting critters, we’ve seen some particularly noteworthy benefits of LHDR:
1 – An obvious benefit is that the dynamic range of our views has been expanded. This enables us to see both faint detail and that from regions with higher illumination. Messiers 42 and 43 form a perfect use case for LHDR. Fiercely illuminated with the energy of suns up to 30 times more massive than our own, the energetic cauldron at the heart of M42 can easily get over-exposed during a live session. After light processing with Registax and Windows 10 Photos, Image 2A presents Orion’s sword in live HDR such that we both pierce the heart of M42 and capture extended nebulosity. Image 2B teases out even more core detail in M42 using a longer focal length and shorter exposures for the LHDR view. The low noise resulting from a high live-stacked frame count permitted effective post-processing in GIMP.
2 – LHDR techniques form a toolkit that enhances the flexibility of a user’s viewing experience. For instance, the MallinCam DS10c used for Images 2A and 2B has relatively low native noise, especially when using low gain settings, sharpening set low, and/or either thermoelectrically cooled or when viewing under frigid winter skies. However, increasing gain increases all signal…true information and noise. If we increase gain to achieve desired illumination for LHDR, objects with brighter backgrounds may experience more noise. On the other hand, comparable illumination using extended exposure length and lower gain will result in less noise amplification.
While extending exposure length works in some cases, many of us experience short viewing windows. As such, the LHDR toolkit enables us to optimize our time viewing different objects by instead increasing gain. In doing so, exposures can be kept to a minimum and still achieve enhanced dynamic range in onscreen views. Your choice of exposure vs. gain comes down to your purpose and your preferences.
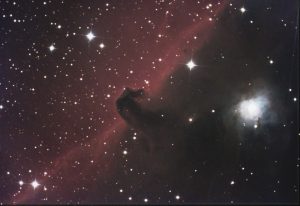
3 – LHDR’s flexibility goes beyond simply adjusting gain or exposure. Many cameras have control software permitting adjustment of contrast, gamma, and myriad other settings during a live capture sequence. For instance, Image 3 represents an unprocessed view of the Horsehead Nebula using LHDR from a MallinCam DS432c camera. Here, detail was teased out by simultaneously adjusting histogram white point, gamma, and contrast settings as the live stack accrued.
4A) Messier 8 in Live HDR unprocessed, using fixed gain, 10 second exposures, and 2×2 binning with adjusted white point to enhance illumination across live-stacked frames. Image captured by Jeff Hammond using a MallinCam DS10cTEC and Celestron C14 at F7 with an Optolong L-eNhance filter.
4B) Frame 4A processed in Photoshop.
4 – In the video astronomy community, emphasis has historically been placed on quick-acquisition of onscreen views, with a secondary emphasis placed on grabbing images for later processing. However, the typically high number of frames stacked when creating LHDR views (often 20 or more) substantially mitigates noise and draws out detail. As can be seen with Messier 8 in Image 4, what better way to spend a cloudy night than running unprocessed twilight LHDR frame A through an image processing workflow to get details in frame B? Though there are other advantages to generating views using LHDR, you don’t get something for nothing. When practicing LHDR, there are some pitfalls for you to bear in mind.
5 – As alluded to above, changing settings can introduce imaging artifacts. For instance, during LHDR runs utilizing longer filtered exposures, we found that manual white balance may be required above and beyond a standard automatic adjustment.
6 – While overexposure can be balanced to a degree with LHDR techniques, you still need to keep an eye on things. Once you’ve overexposed something, it can be very difficult (or prohibitively time-consuming) to regain that detail. We’ll provide an example of progression through an LHDR acquisition later in this article to illustrate how overexposure can creep in.
7 – Your goal may be to minimize gain during a longer exposure LHDR capture as a means of reducing noise. However, exposure length may be limited by polar alignment or use of an alt/az mount. You may simply have to “settle” for a great view with a little more noise.
8 – As effective as it can be adjusting multiple settings on the fly, doing so isn’t necessarily relaxing. These adjustments often require estimating/adjusting to your new histogram black point for the first updated frame, all the while waiting to quickly readjust the histogram as needed should the black point estimation be wrong. Even when controlling only one camera at a time, this type of workflow can take some concentration. Using two cameras and adjusting multiple simultaneous settings (something with which one author has experimented) is understandably more intense.
Exploring the night sky should feed the soul, and rapt attention to workflow might undermine someone’s ability to relax under a hushed midnight canopy. Thus, co-author Jeff Hammond articulated an approach to LHDR that is effective, yet substantially simplifies the workflow when capturing LHDR views with one or two cameras simultaneously.
A Third LHDR Option: Histogram White Point Adjustment (WPA)
The approaches involving alteration of gain and exposure each come with shortcomings. Changing gain or exposure mid-stack requires anticipating how much your histogram will shift…not a trivial endeavor, as a bad adjustment could either clip data or unnecessarily brighten your background. And, with some camera control software, frame-capture loops that build your stacks need to be stopped before changing gain or exposure when going after really faint objects. Finally, your maximum exposure lengths may be limited. The WPA approach to LHDR bypasses these shortcomings by adjusting histogram white points during an image stack.
How does changing the histogram affect a view? A basic illumination histogram displays the counts of pixels falling at each luminance level, split into increments ranging from 0 to 255. Though software such as MallinCamSky permits changes in red, green, and blue histograms independently, we will focus only on overall luminance (i.e., “RGB” in MallinCamSky). To slide the black point (the left slider) up from zero transforms the darkest pixel(s) in your image into pure black. Thus, setting the black point to 50 means that any pixels with a luminance below 50 become the blackest of black. Similarly, sliding the white point (the right slider) down to 200 from 255 transforms every pixel at or above a luminance level of 200 into the brightest of bright (not necessarily pure “white”, though that’s the nomenclature). In turn, your camera software will then “stretch”, or rescale, the remaining 150 points of luminance (i.e., 200-50) to fit a 0-255 range.
The WPA approach takes advantage of the white point adjustment in two ways. First, it will result in a change in illumination without requiring significant (if any) adjustments to the black point. Second, pixels at the high end of the luminance scale are given the maximum value. Though the underlying mechanisms may differ across cameras, the net effect is increasing luminance of pixels that define brighter details in your desired targets.
5A) Messier 33 in Live HDR unprocessed, using fixed gain, 20 second exposures, Celestron UHC/LPR filter, and 2×2 binning with adjusted white point to enhance illumination across live-stacked frames. Image captured by Jeff Hammond using a MallinCam DS10cTEC and Celestron C14 at F7.
5B) Frame 5A processed in Photoshop.
While this semi-technical and dramatically over-simplified description is all well and good, it doesn’t tell us how to actually perform LHDR with WPA. After all, most of us (in our youthful enthusiasm) have experimented with the white point slider and ended up with an onscreen explosion of garish noise and photonic mayhem. With great power comes great responsibility, or something like that.
The first step in the WPA approach is to find the right settings for the LHDR stack to start slightly underexposed. To do so, find one of the brightest details within your target of interest. For instance, if we were going after Messier 33 (the Pinwheel galaxy), we could select the HII region NGC 604 at the lower right in frame A of Image 5 indicated with an arrow. This unprocessed image is intentionally relatively faint, as it illustrates both the underexposure idea and was intended to receive post-processing such that detail in NGC 604 is retained while fleshing out the rest of the galaxy (see frame B).
With that small target in mind, configure your initial camera settings such that the object is barely starting to over-expose. Ideally, this would put the peak of the histogram somewhere around 60. Then, a slight increase in gamma would slide the histogram peak down to the neighborhood of 40. Note, there’s nothing magic about these histogram benchmarks…they simply represent a point at which you have room to adjust the black point without clipping much data, yet have ample room to adjust white point as well.
With your slightly underexposed settings in place, begin the live stacking process. Depending on the noise inherent in your viewing system (e.g., an uncooled, inherently noisy camera on a hot summer night vs. a cooled, low-noise camera with frost clinging to your eyebrows), you’ll have to determine how many frames to stack with this lowest illumination view. How many frames is a matter of personal taste and equipment characteristics, but digitally zooming in your view will enable you to see how noise is being addressed with each stacked frame, thus permitting you to decide when you’ve mitigated enough noise and can begin increasing illumination. Some folks like to stack a handful of frames for this base illumination view. Others may stack more than 20 frames prior to beginning the LHDR white point adjustment.
Once the base illumination, low-noise stack is established, this is where WPA comes in. With some software, histogram settings can be altered in real-time…there is no need to stop a loop to reset. Thus, adjustments in white point are rendered upon stacking of the very next frame. To determine the degree of adjustment, note the point where the righthand side of the histogram reaches its greatest extent. For sake of argument, let’s say that the plotted histogram data maxes out at 100 on the x-axis. Given that the full luminance range goes up to 255, drop the white point about 75% of the distance between the two numbers (here, slide the white point roughly ¾ * (255-100), or about 116 points, to the left).
Once the white point drop is made, the ongoing stack will accrue frames with the new luminance settings. As they add to the stack, keep an eye on both the overall target as well as the bright object on which you focused attention when setting up the base stack. Continuing our example of M33, we’d keep an eye on NGC 604. When reaching a point where Messier 33 has desired overall illumination and/or NGC 604 is getting noticeably overexposed, snap your image. Whereas Image 5A seemed underexposed, the end goal for this image was to process and end up with 5B. Had more high illumination images been added, the unprocessed LHDR image would have continued to draw out more extended detail of M33 at the expense of overexposed detail in NGC 604. This is a perfect example of your ability to control details on which to focus your attention, and whether it will happen in the live session or after the fact.
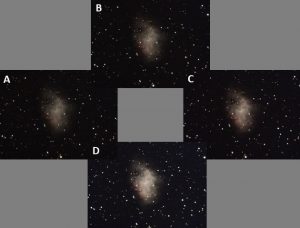
Image 6 illustrates the LHDR progression using unprocessed frames A through D with no goal of post-processing. Here, one of the authors modified the WPA approach by using multiple adjustment intervals instead of one big white point adjustment. As you can see, frame A shows a slight underexposure of Messier 1 in which the red tendrils barely begin to emerge. After 15 average-stacked frames, the white point was dropped to 200. An additional 10 frames were added to the stack at this setting for frame B. With another 15 frames and the white point at 150, we arrive at frame C. Note how we are seeing quite a bit of detail in the nebula itself, but also seeing more of the tendrils. In frame D, we added another 10 frames with a white point of 100. This was done to illustrate how the core of the nebula is on the brink of overexposure, and there seems to be a slight bluish cast emerging in the frame’s dark regions.
What are some Do’s and Don’ts for LHDR?
Guidelines and workflows in this article are representative of the authors’ interests, equipment, and viewing conditions. As such, we encourage you to use this information as a starting point for your own preferred approaches. That said, there are some fairly universal points that might serve you well as you experiment with LHDR.
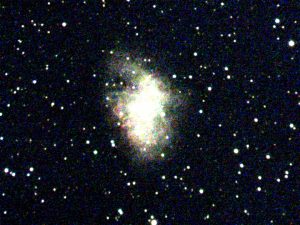
1 – Allowing stacks to accrue after changing settings requires monitoring of the image: When you blow out an image, sometimes you can recover by adding frames with less illumination. However, doing so might also introduce artifacts that warrant restarting the stack. This is because the highest illumination frames being added may be overexposing potentially critical details. Recall frame D in Image 6: We indicated that it was on the verge of overexposure as evidenced by the brightening core and a bluish hue emerging in the frame. This overexposure is because frames being added at a white point of 100 contained dramatically overexposed views on a background with blue noise (see Image 7). With lots of frames in a stack, this kind of globster may not be immediately obvious. But, it could be lurking, silently waiting to swipe its brilliant brush-stroke across your masterpiece.
2 – When targeting a specific level of illumination, noise increases faster with increased gain than with extended exposure times. When faced with a choice, increased exposure begets less noise.
3- Even with the simplicity of the WPA workflow, it is still helpful to monitor other settings such as white balance, sharpness, etc. as the stacks accrue. As Image 3 illustrated, simultaneous adjustment of multiple settings during a live stack can reveal beautiful detail.
4 – Consistent with item 3, cameras with substantial amp glow may require inclusion of a more aggressive dark frame as the stack accrues frames using a lower white point value.
5 – Not all targets are created equal: Some exemplify very broad dynamic ranges, thus will take some practice before getting your desired onscreen view. Messier 42/43, for all of its glory, represents a challenge for capturing the full range of illumination during a viewing session. This is due to the broad illumination range between the Trapezium region and M42’s billowing curtains of extended nebulosity. But, LHDR images play nicely with processing software, and M42/43 can really pop.
6 – Just as with any other imaging endeavor, aperture, focal ratio, filter usage, etc. will all need to be taken into account with LHDR techniques.
7 – You don’t NEED to do LHDR. And, if you do, don’t be afraid to combine or experiment with techniques…both those described in the LHDR articles and new approaches that you come up with. As with many things, achieving what you want to see, with your equipment, and under your viewing conditions gives you the opportunity to find your own astronomical voice.
In Conclusion
In conclusion…what should we conclude? That’s always a tough question. We do live in an incredible age of technology, but that’s kind of an obvious point. Maybe we could conclude that amateurs need only put as much or little time into capturing and processing images as they wish…LHDR (and video astronomy in general) can suit any taste. Shoot…that’s another obvious point. Maybe THE conclusion is that you don’t need fancy gear, don’t need to be an expert, nor need to follow rigid rules to produce some beautiful live HDR images. Feel free to experiment. Freely question and refine your techniques. Most important? Just have fun.
 By Matt Harmston
Matt Harmston is an educational researcher whose appetite for the heavens has been whetted by increasing aperture over the years. More recently, Matt has immersed himself in video astronomy – a means of probing deeper into the night sky while making astronomy accessible to all ages and abilities. With this technology readily available, Matt is considering a career as a sleep-deprivation research subject.
 And to make it easier for you to get the most extensive news, articles and reviews that are only available in the magazine pages of Astronomy Technology Today, we are offering a 1 year magazine subscription for only $6! Or, for an even better deal, we are offering 2 years for only $9. Click here to get these deals which only will be available for a very limited time. You can also check out a free sample issue here.