
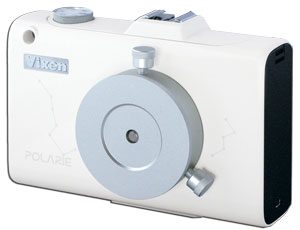
With the Vixen Polarie, Vixen offers this neat little device that looks kind of like a camera. In fact, it’s actually about the same size and weight as an old Leica M9. It even has a flash shoe! Doesn’t look like much, does it?
However, if you own a basic camera tripod with an articulating head, add this and a ball head and you’re ready to get started in wide-field astrophotography. If you don’t have a tripod/head combination in your arsenal, Vixen offers a package that includes all the necessary components.
 The first thing I noticed when I opened the box was how much heavier the Polarie was than I anticipated. Not that it’s heavy, but it sure is heftier and more solid than I expected. This is a serious piece of equipment.
The Polarie serves the basic function of a motorized barn-door tracker, but is built to Vixen’s exceptional quality standards and is far easier to polar align that your traditional barn-door device.
My only previous ownership experience with Vixen products has been limited to their eyepieces and those are still in my observatory, even after divesting myself of most of my observing gear to focus more exclusively on astrophotography.
I’ve seen numerous Vixen telescopes and mounts at star parties and conventions, but never owned or used them personally, and having now experienced the Polarie, I feel like I might have been missing out on some very well-built equipment over the years.

The Polarie looks like nothing I’ve ever used in astronomy, either for observing or imaging. At first glance, I had no idea how it worked, but after about 10 minutes of flipping through the manual, I was on my way to making the image shown in Figure 1. That’s the result of only 10 exposures of 15 seconds each using a Canon T2i (aka, Canon 550D) and a generic 50-mm lens with a wireless remote control for the camera. I didn’t use any dark, flat or bias frames in processing this image. I just shot, stacked and tweaked it in Photoshop.
So how does this thing work? First you need to understand the design of the Polarie, and for that I’m going to reference the of the device. See the big silver disk on the front of the unit? That’s where you mount the ball head that will hold your camera; the documentation labels it the “Camera Mounting Block.”
It is removed by loosening the two thumbscrews located on the side of the disc and then pulling it forward. Then you can push a spring-loaded screw forward and screw it into the bottom of the ball head to which you will mount your camera. Depending on the type of ball head you’re using, you might need a bushing to reduce 3/8-inch threads to match the 1/4-inch threads on the mounting block. The Polarie uses a standard 1/4-20 screw size, but some ball heads use the alternate 3/8-inch size. Fortunately, any full-service camera-supply store should stock the necessary adapter for only a couple dollars.
On the right side of the Polarie Star Tracker is an illuminated tilt meter that you can use to set the tilt of the Polarie to match your latitude. If you look at the back of the unit, you’ll see another silver disk. Unscrew that and you have a handy compass that you can use to set up your tripod. This is a very nice touch! See the little hole in the top right corner of the Polarie (assuming you’re looking at it from behind)? That’s your polar alignment sight.
There, that’s all the bits we need to get started.

I set the Polarie up on an old tripod that is topped with a really heavy tri-pan head (Bogen 4037). The head is designed to carry my old medium-format camera and any lens I can attach, so no capacity worries there. Also, the head is capable of tilting nearly vertical. I attached the Polarie to the big Bogen head, leveled the tripod and rotated the head to point toward Polaris (see the connection?). Next, I tilted the head so that I could see Polaris through the polar alignment sight.
Oh yeah, there’s that little dial on the top of the unit. Turn that to the “Preparation” position and the tilt meter lights up. Tilt the head holding the Polarie until the tilt-meter indicator roughly matches your latitude. This should get you close to where you can see Polaris through the built-in polar-alignment sight. Use the head holding the Polarie to adjust the polar alignment so that Polaris is centered in the polar alignment sight. Once you’ve performed these steps, you’re ready for some wide-field astrophotography.
Before you start, switch the mode dial to the picture of a star for diurnal tracking rate. As you can see in Figure 1, I was able to achieve pretty nice stars using 30-second exposures. As you move further from the equator you should be able to increase exposure length without star trails.
Vixen has included a table in the user guide indicating recommended exposure limits for various lens focal lengths combined with latitude separation from the equator. My location indicated roughly 2-minute maximums for this combination, but I was unable to go that long using rough polar alignment. I’m sure more careful alignment would get me closer to the recommended limits.
To achieve longer exposures, you need much better polar alignment. Vixen has a solution for that. Remove the camera mounting block and the compass from the Polarie and insert the optional polar-alignment scope and you’ll be able to achieve a much more accurate polar alignment. Once I did that, I was able to take 7-minute exposures and retain nice round stars. I’m sure I could have gone longer. Sadly, my sky conditions made the stars all but invisible after that amount of time, even at low ISO settings.
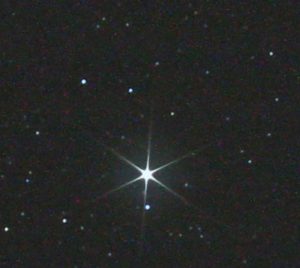
Figure 2 shows the full frame of a single 7-minute exposure while Figure 3 shows a crop of the same image at 100-percent resolution. The processing of this image was a levels adjustment to darken the background and little bit of noise reduction. If you ignore the remaining noise in the image, you can see that the stars are quite round in these images.

With a little patience and a fine polar alignment, I was able to generate the image shown in Figure 4. For this image, I used the T2i with a 135-mm lens. This time I took 15 exposures of 2 minutes each. The exposure length was limited by my sky conditions, not the ability of the Polarie. I also oriented the camera vertically to provide a different composition from that of the the wide-field view shown in Figure 1.
As you can see, there is quite a bit of data in there, even with the limited total exposure time and despite the levels of light pollution I deal with on a regular basis. You can also see that the foreground tree is blurred by the length of the exposure and the tracking of the mount. There’s also a bit of movement in the branches over time (darn wind), but I think it makes for a more interesting image than if I had shot earlier and not included the tree.
The Vixen Polarie supports the four following tracking modes: (1) Star-Scape Photography, which tracks at half speed; (2) Wide-Field Astrophotography, which tracks at full speed to prevent star trails; (3) Solar Tracking, which tracks at mean solar speed; and (4) Lunar Tracking, which tracks at mean lunar speed.
Obviously, I used the Wide-Field Astrophotography setting for these images. For compositions that include foreground objects or landscape features, you could use the Star-Scape setting to generate images where the foreground is not blurred, however, that would also limit the maximum duration of your exposures in order to achieve images without star trails.
I suspect it will also limit the overall exposure time or the stars will have moved enough relative to the foreground to cause either star trails or blurring of the foreground subject. Unfortunately, I did not have enough time with the Polarie to explore this setting fully, but think it could be a very interesting mode if you have a fast enough camera lens and some interesting foreground material.
The solar and lunar tracking modes are pretty self explanatory. I don’t have any gear that is light enough for use in the solar mode and there wasn’t enough time for me to do anything with the lunar mode during this project.
I don’t normally include a pro/con list in my articles, but I will this time because I think there are some compelling reasons. Unlike every other pro/con list I’ve ever read, I’m going to start with the cons. I hate to end an article with the cons when there is so much more to like about the Vixen Polarie Star Tracker.
The Vixen Polarie is extremely portable. Any usable imaging platform will require a tripod and at least one head. The nature of the beast dictates two heads, unless the head used to mount the Polarie itself is included in the tripod design. The Polarie’s rated weight capacity of only 4.4 pounds puts very little strain on the base platform, so you could certainly get by with a lighter tripod/head combination than the one I used.
The Polarie provides very good tracking for wide-field imaging. Remember, a 50-mm lens on my T2i is the equivalent of an 80-mm lens on a 35-mm film camera, and the 135-mm lens I used is roughly equal to a 215-mm lens on that same film camera. I was able to make 7-minute exposures with the 50-mm lens and at least 4-minute exposures with the 135-mm lens. Anything longer than the 135-mm, and I feel you’ve gone beyond the bounds of wide-field imaging when using the widely popular APS-based cameras.
Vixen also provides a complete package for those who don’t own any photographic equipment. You can purchase the Polarie, polar-alignment scope, tripod and ball head (the tripod is designed so that you only require one head) directly from Vixen. This is a great idea, and from what I can tell, the tripod and ball head are competitively priced with commercially available tripods and ball heads.
I like the ability to use the variety of tracking speeds provided by the Polarie. I would love to have had the time to play with the Star-Scape mode so that I could make some images with the local city (Worcester, Massachusetts) in the foreground. The moon rising over the city would be really neat, as would Orion or any of the larger constellations.
I know I mentioned this before, but the Polarie really is well built. Every seam is clean and tight and the threads are silky smooth. The fit and finish of this tracker is simply excellent.
So after all that, how do I feel about the Vixen Polarie? The Polarie is certainly not the only motorized barn-door-style tracker on the market. Vixen has learned from the predecessors and made improvements where possible while maintaining competitive price points. The lack of illumination on the polar alignment scope and the weak English-language documentation are, in my view, oversights, but are certainly not major impediments to successful wide-field imaging with the Polarie.
If you’re looking for an ultra-light, portable platform to use for wide-field astrophotography, the Vixen Polarie definitely deserves serious consideration. To my knowledge, it is the smallest motorized barn-door-style tracker on the market. Plus, it is very well built and reasonably priced. If you don’t need high load capacity or auto-guiding, the Vixen Polarie could well be all you require for successful wide-field DSLR astrophotography.
 Dave Snay is a retired software engineer living in Central Massachusetts. He graduated from Worcester Polytechnic Institute and has been an amateur astronomer and astrophotographer for a number of years. He also pursues fine art photography and enjoys traditional black and white images.
And to make it easier for you to get the most extensive telescope and amateur astronomy related news, articles and reviews that are only available in the magazine pages of Astronomy Technology Today, we are offering a 1 year subscription for only $6! Or, for an even better deal, we are offering 2 years for only $9. Click here to get these deals which only will be available for a very limited time. You can also check out a free sample issue here.